08 Nov 2015
Intoduction
SPA (Single Page Applications) have never been easier to build with technologies like Spring Boot, AngularJS and Bootstrap.
The idea of SPA applications resolves around the idea of a main page which gets loaded once and then everything is done through Ajax calls asynchronously and without relaoding of the page.
The generic architecture of an SPA is composed of two separate parts, frontend and backend, a standard JSON API to exchange information over HTTP and the frontend being totally responsible for everything that the uses sees.
In this sense backend is now responsible only to provide the required Json payloads responding to HTTP verbs (GET, POST, PUT, DELETE) and doesn’t build any presentation layer pages (like JSP and JSF do). What is more the frontend accomplishes everything without refreshing the whole page but only particular pieces in the page using of course AJAX.
Benefits of this way of building SPA are the following:
- Separate teams having backend and frontend as only a definition of the JSON API is required and both can work independently from then on.
- Much easier testing of the front or the back end
- Much easier integration of other clients (f.e. mobile app) consuming the same JSON Api therefore allowing you easy expansion to other devices
In this post we are going to build a simple SPA with CRUD operations for a simple Bookmarks application where the user can view/edit/save/delete bookmarks grouped in categories. For the backend part we will use Spring Boot and Mongodb and for the front end we will use AngularJS and Bootstrap.
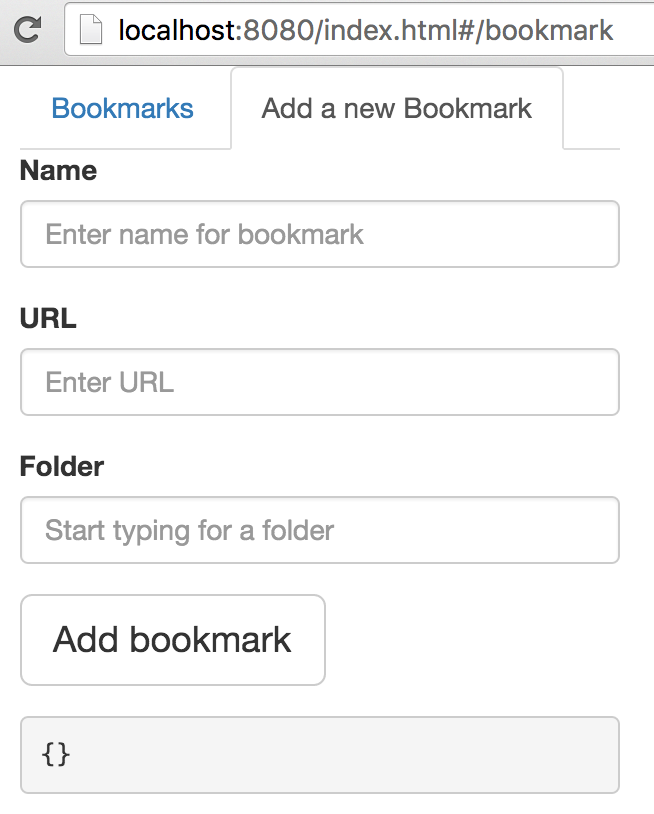
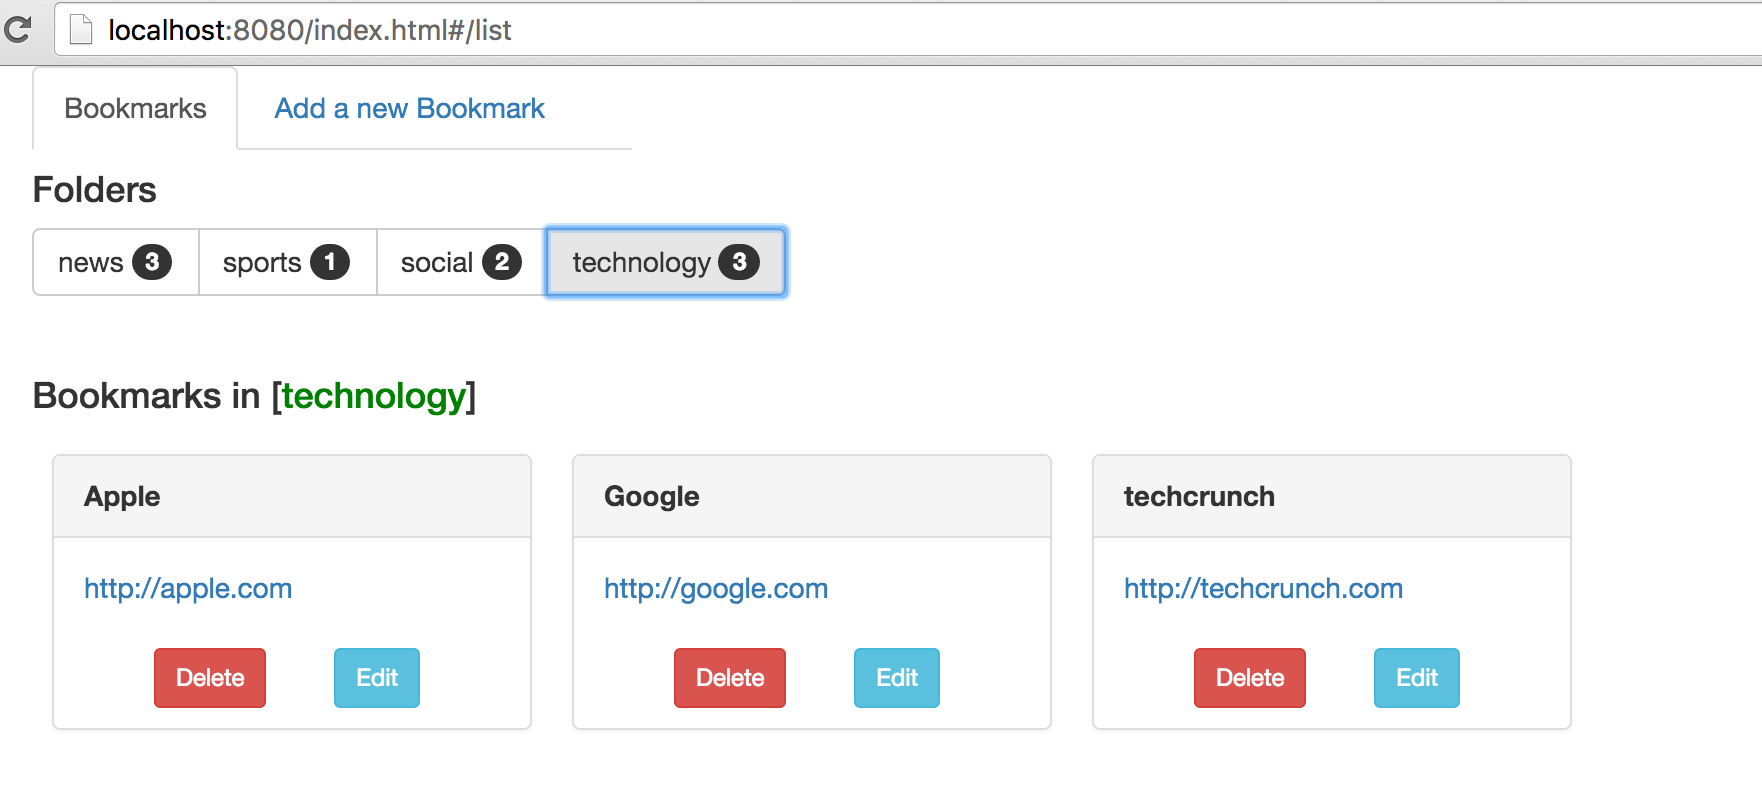
For demonstration purposes and in order to be able to cover more things related to AngulaJS the application’s page has 2 tabs.
- One contains the form to add/edit a new Bookmark:
- and the other displays the big overview:
Backend
Setup
Starting with the Backeend whose sole responsibility is to reply to Http requests with JSON payload we will utilise the Spring Boot framework which makes all the setup very easy. Opening Start Spring IO we are in a web application where we can define what we need for our project and generate at the end a zip file which we can use as the skeleton of our project. We need only Web and MongoDb.
After we extract the project we are good to go. One last setup test is to start on a directory of our choice the mongoDB by running mongod -dbpath database/
Model
Our model is very simple, just a Pojo representing the Bookmark entity we want to work with.
import org.springframework.data.annotation.Id;

public class Bookmark {

	private String name;
	private String url;
	private String folder;

	@Id
	private String id;

        //getters/setters

}
Logic
Our codebase already contains a generated class ending in Application which is annotated with SpringBootApplication and it is basically the one which will be used to start our application. Because of the annotation also it scans and wires up all Spring object we declare like Controllers, Services etc…
First we declare a repository interface BookmarkRepository which extends MongoRepository<Bookmark, String> and will basically cause Spring Data to implement besides the common CRUD operations, any other methods that we have defined inside our repository. For this case we just define a method to give us back the bookmarks for a folder.
We proceed with defining our Controller class which will contain all of the request/response processing. This class needs to be annotated with RestController, RequestMapping(“/bookmarks”) where /bookmarks is the url endpoint we will need to access our service.
A GET and a POST operation will be shown here as the rest follow the same coding pattern.
	@Inject
	private BookmarkRepository bookmarkRepository;

	@RequestMapping(method = RequestMethod.GET)
	public ResponseEntity<Iterable<Bookmark>> getAllBookmarks() {
		Iterable<Bookmark> all = bookmarkRepository.findAll();
		return new ResponseEntity<>(all, HttpStatus.OK);
	}

	@RequestMapping(method = RequestMethod.POST)
	public ResponseEntity<?> createBookmark(@RequestBody Bookmark bookmar) {
		Bookmark saved = bookmarkRepository.save(bookmar);

		// Set the location header for the newly created resource
		HttpHeaders responseHeaders = new HttpHeaders();
		URI newBkUri = ServletUriComponentsBuilder.fromCurrentRequest()
				.path("/{id}").buildAndExpand(saved.getId()).toUri();
		responseHeaders.setLocation(newBkUri);

		return new ResponseEntity<>(saved, responseHeaders, HttpStatus.CREATED);
	}
After the injection of the repository, we declare a GET method which returns all the bookmarks using the findAll method of the repository. A ResponseEntity object is returned which is SPring way of encapsulating a response body along with a response header. An OK(200) code is retuned in this case. The POST method uses again the injected repository to do the save and then builds a CREATED(201) response with a location header of the url where this link will be available. In our example this will be something of the form http://localhost:8080/bookmarks/565a1de077c88fe61a7d06b5. For this request to be served we need yet a other GET request method:
	@RequestMapping(value = "/{bookmarkId}", method = RequestMethod.GET)
	public ResponseEntity<?> getBookmark(@PathVariable String bookmarkId) {
		Bookmark p = bookmarkRepository.findOne(bookmarkId);
		return new ResponseEntity<>(p, HttpStatus.OK);
	}
Which will return the JSON represting the created bookmark.
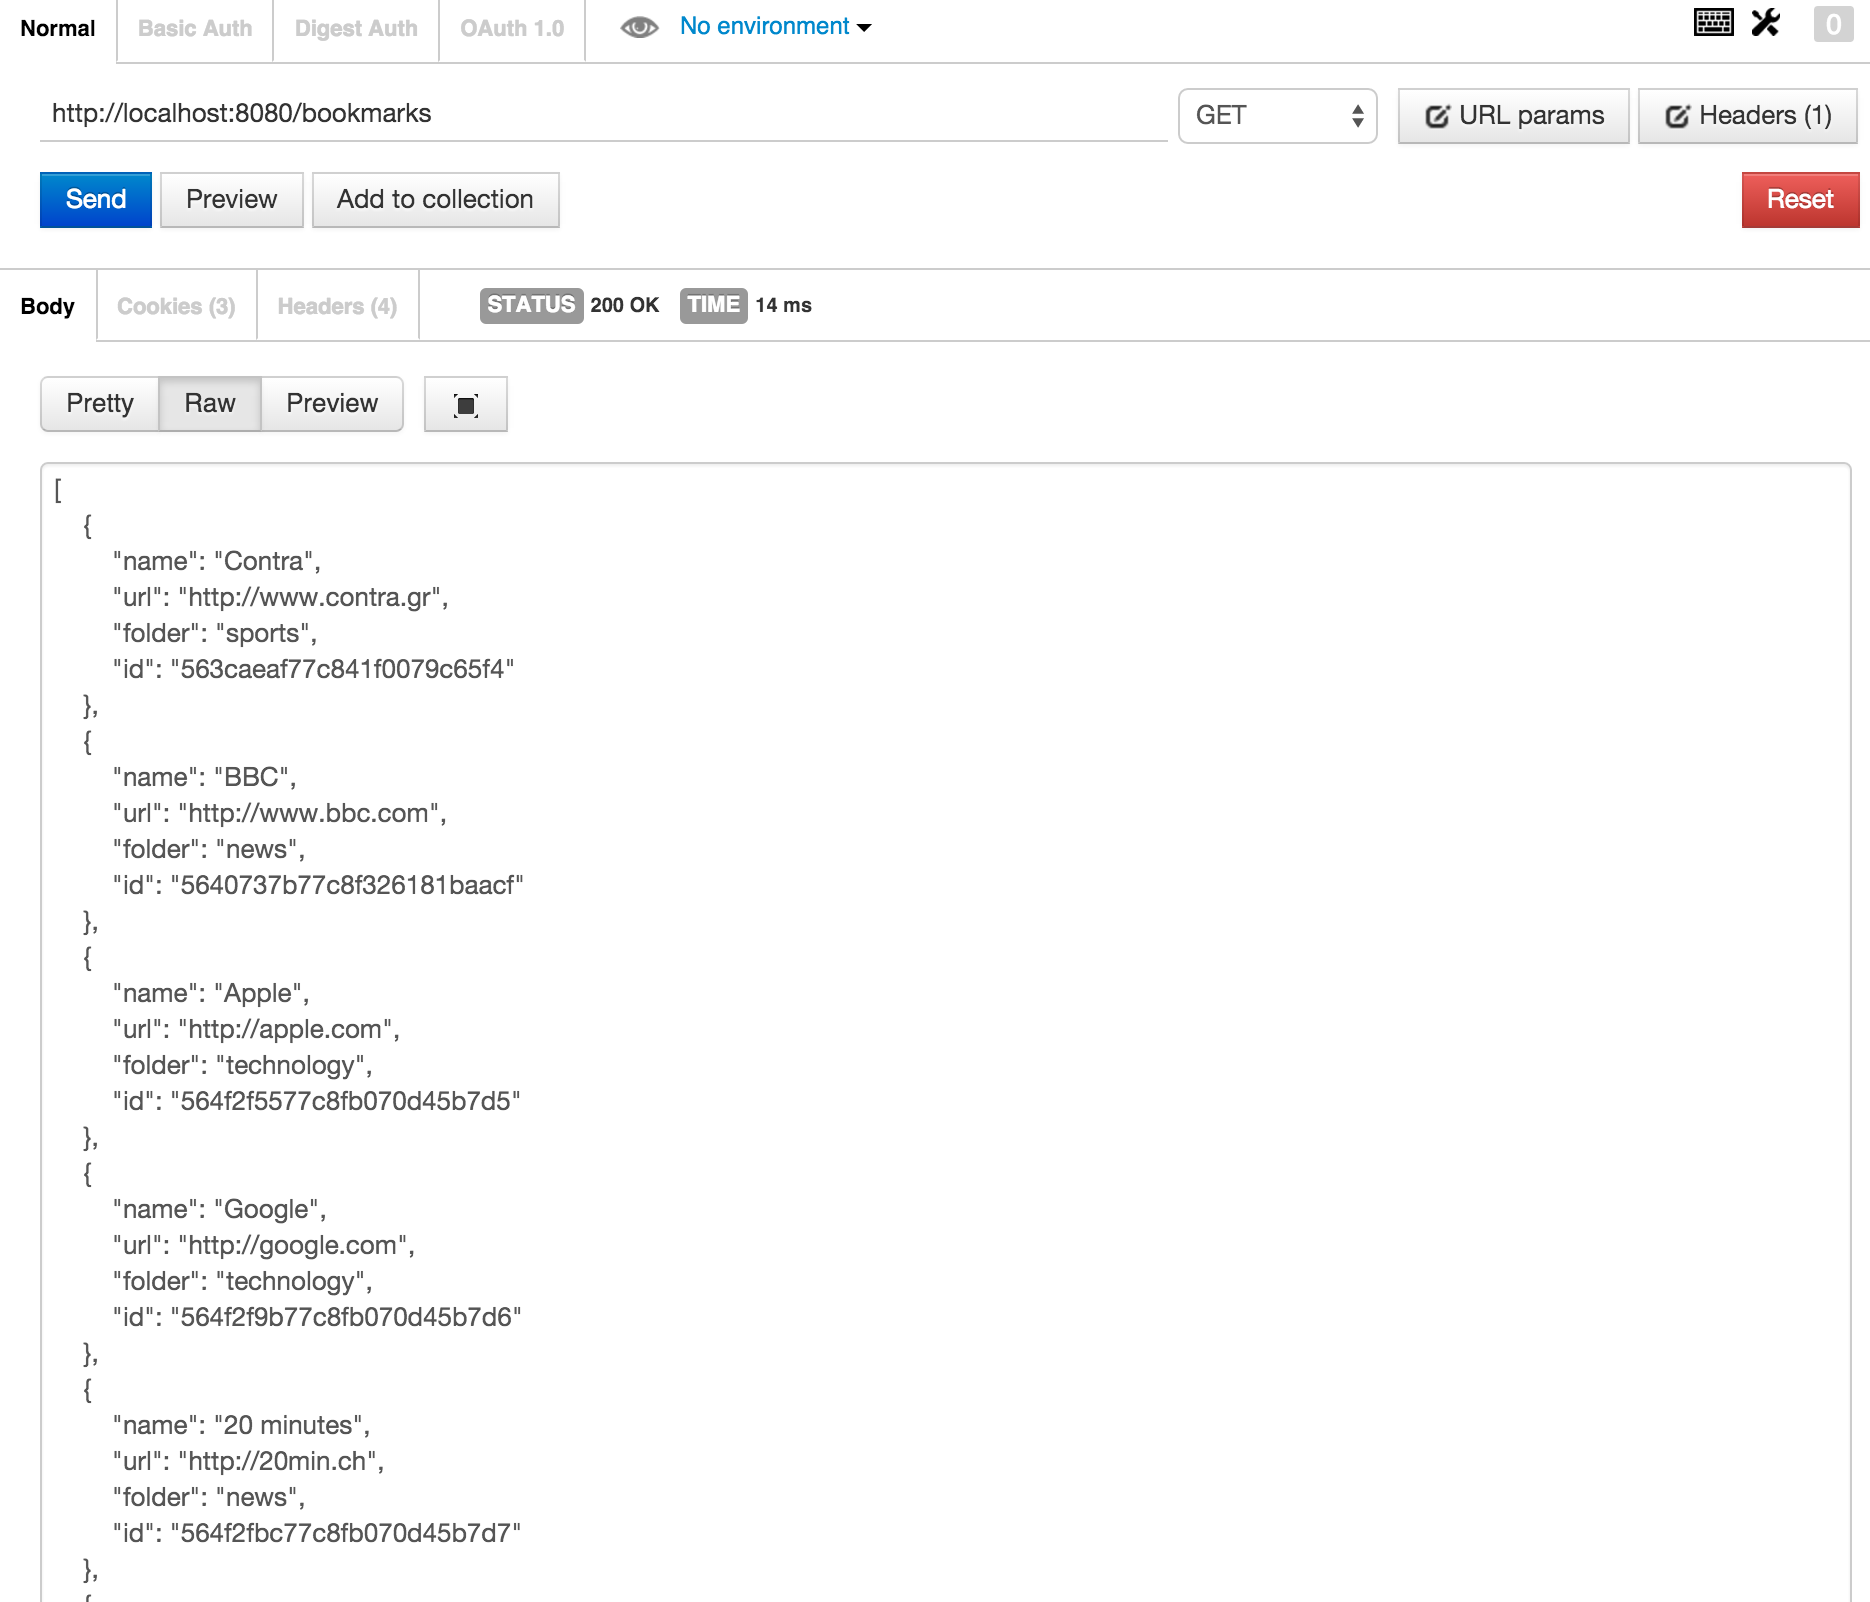
We can easily test our JSON API using a plugin for the browser we are using. For Chrome i use Postman.
First we create a POST reauest:
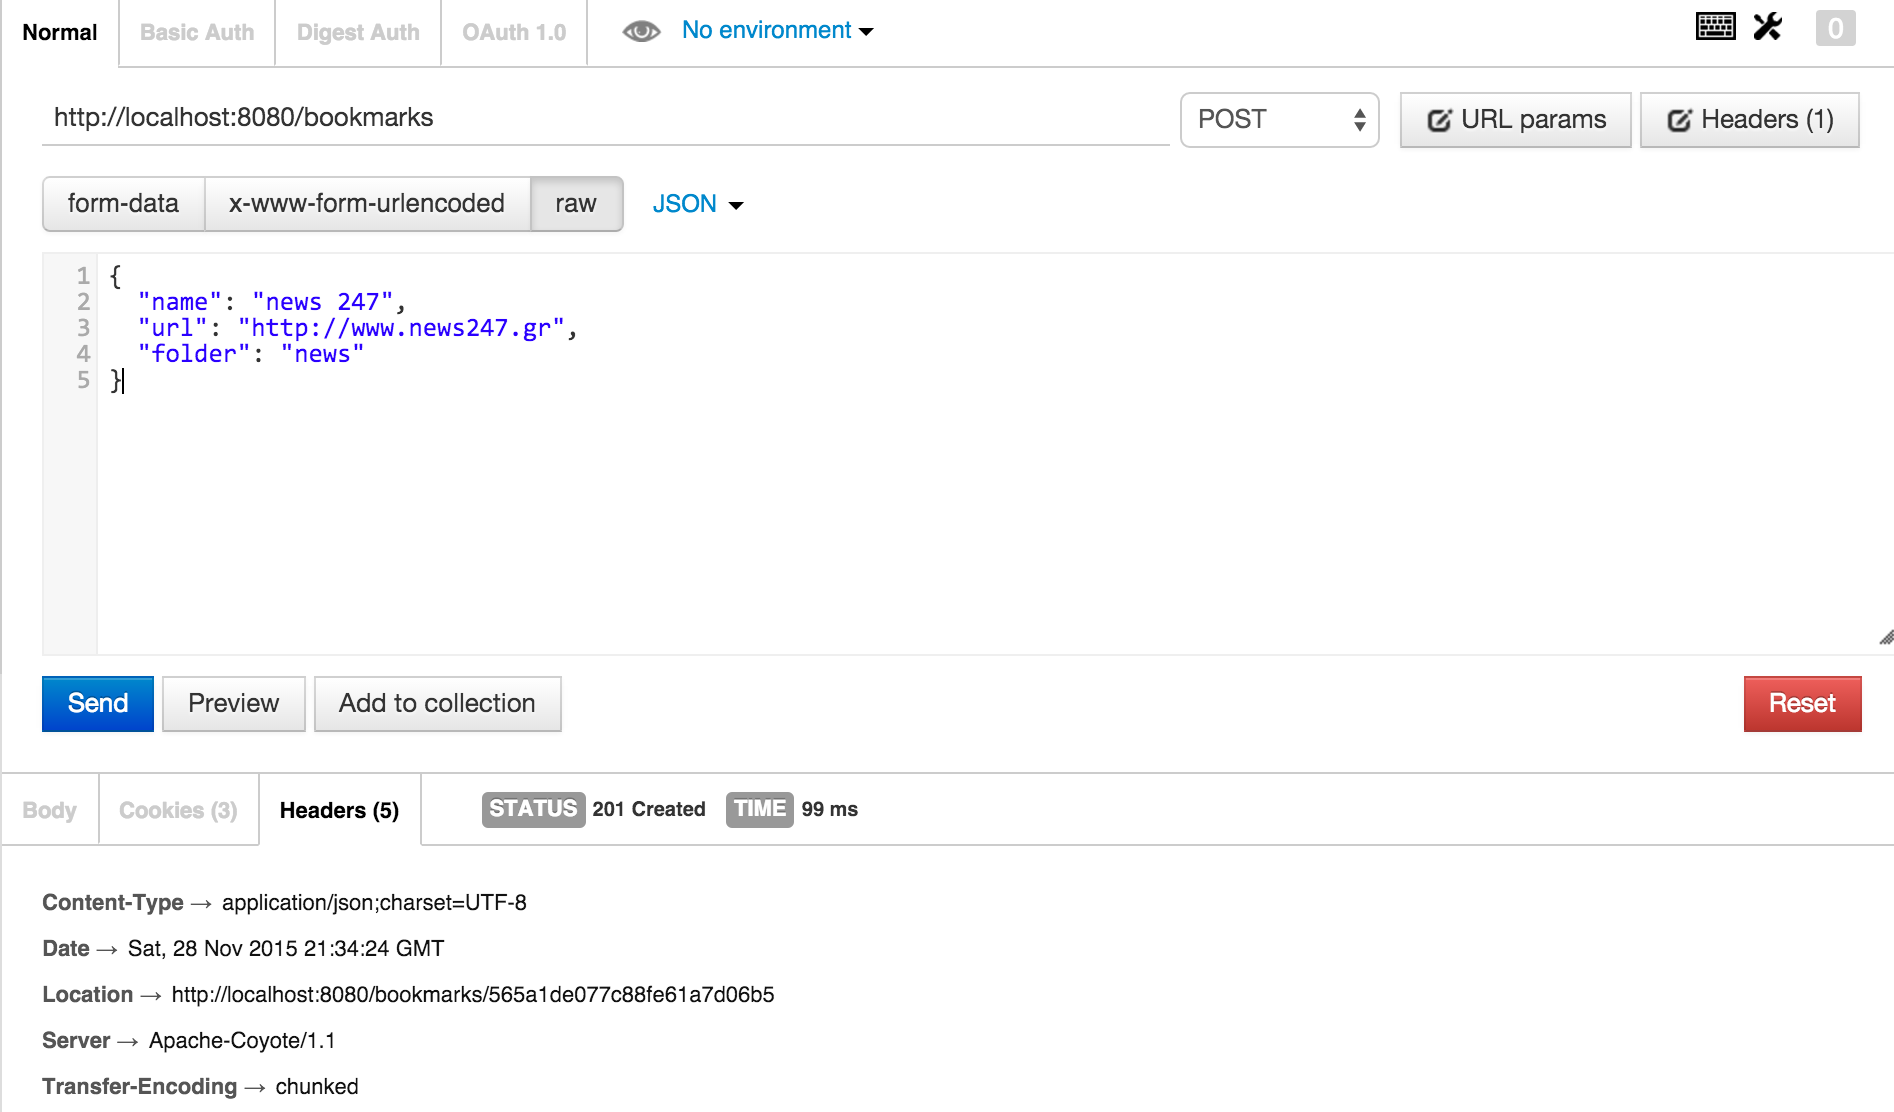
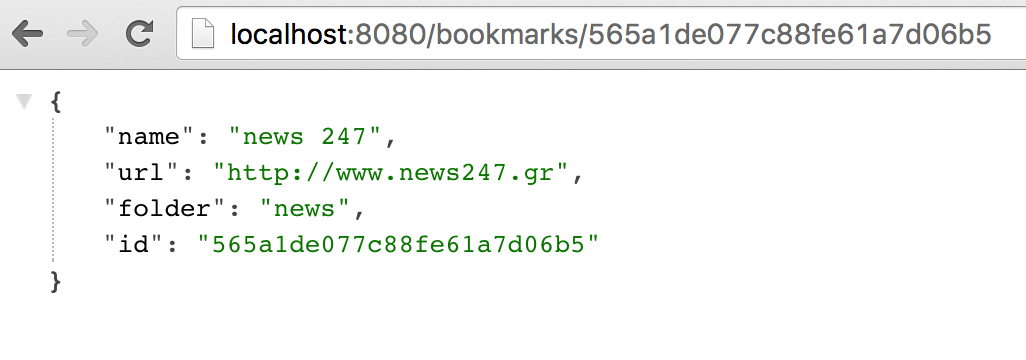
Notice in the response headers we got a Location header with the url we can use to retrieve the bookmark back. If we browse to it we get:
Using POSTMAN once again for our first method we get back a JSON array of all the bookmarks created so far:
The rest of the methods follow similar patter and define other url endpoints to view particular details needed for the front end.
Frontend
For our application we will have 2 AngularJS controllers, each one handling each of the tabs we have. The files that compose the frontend pat of the application have the following structure:
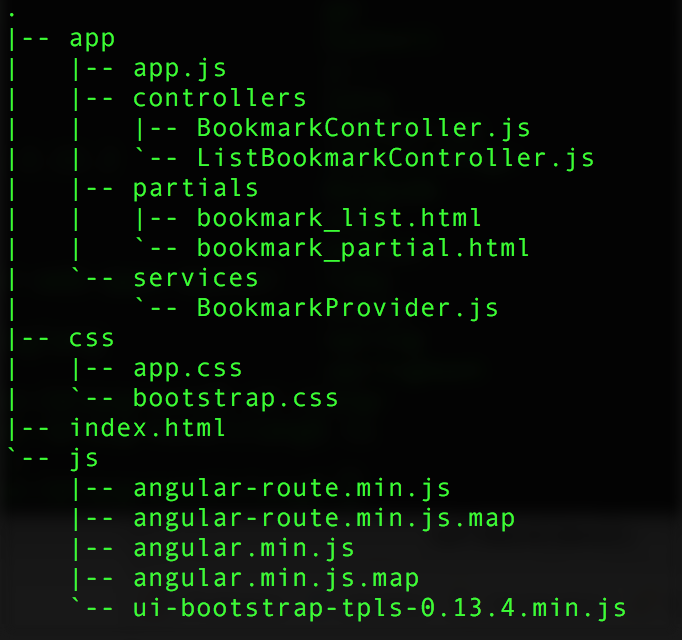
Our application is composed of:
- an index.html file which defines the entry point to our app.
- an app.js file which defines our routes to our modules
- controllers folder with js files defining the brain of each module
- partials folder with html files defining the view of our application
- services folder with common javascript functionality shared betwenn modules
- css folder with the standard bootstrap css and our custom one
- js folder with angular javascript files and the ui-bootstap one
Every request hits this html and particular suffixes in the urls starting with the hash # define the particular parts of our application that we want to visit. This routing is controlled by the app.js file:
bookmarkApp.config(function($routeProvider) {
	$routeProvider.when("/bookmark", {
		controller : 'BookmarkController',
		templateUrl : 'app/partials/bookmark_partial.html'
	}).when("/bookmark/:id", {
		controller : 'BookmarkController',
		templateUrl : 'app/partials/bookmark_partial.html'
	}).when("/list", {
		controller : 'ListBookmarkController',
		templateUrl : 'app/partials/bookmark_list.html'
	}).when("/", {
		redirectTo : "/list"
	});
});
This mapping is quite straightforward. As an example if we call url http://localhost:8080/index.html#/list
then the ListBookmarkController will execute using as a template the file bookmark_list.html.
The source code for one of the controllers is the following:
// Common pattern when defining a controller
(function() {

        // Constructor used to wire up Angular objects and services
        // and assign objects and functions to $scope
	function ListBookmarkController($scope, $location, BookmarkProvider, $modal, $log) {
		$scope.listActive = true;
		$scope.messages = [];

                // retrieve folders
		$scope.getFolders = function() {
			BookmarkProvider.getFolders(function(err, folders) {
				if (err) {
					$scope.messages.push({
						type : 'danger',
						msg : err.message
					});
				} else {
					$scope.folders = folders;
				}
			});
		};

		$scope.deleteBookmark = function(bookmark) {
			$scope.toDelete = bookmark;
			$scope.modalInstance = $modal.open({
				animation : true,
				templateUrl : 'deleteTemplate.html',
				scope : $scope,
				size: "sm"
			});

			$scope.modalInstance.result.then(function() {
			}, function() {
				$log.info('Modal dismissed at: ' + new Date());
			});
		};

		$scope.ok = function() {
			BookmarkProvider.deleteBookmark($scope.toDelete, function(err, folders) {
				if (err) {
					$scope.messages.push({
						type : 'danger',
						msg : err.message
					});
				} else {
					$scope.getFolders();
					$scope.getBookmarksInFolder($scope.toDelete.folder);
					$scope.messages.push({
						type : 'success',
						msg : 'Bookmark deleted!'
					});
				}
			});
			$scope.modalInstance.close();
		};

		$scope.cancel = function() {
			$scope.modalInstance.close();
		};

		$scope.closeAlert = function(index) {
			$scope.messages.splice(index, 1);
		};

		$scope.editBookmark = function(bookmark) {
			$location.path('/bookmark/' + bookmark.id);
		};

		$scope.getBookmarksInFolder = function(name) {
			BookmarkProvider.getBookmarksInFolder(name, function(err, bookmarks) {
				if (err) {
					$scope.messages.push({
						type : 'danger',
						msg : err.message
					});
				} else {
					$scope.folder = name;
					$scope.bookmarks = bookmarks;
				}
			});
		};

		$scope.getFolders();
	};

	bookmarkApp.controller('ListBookmarkController', ListBookmarkController);

})();
And the template file which this controller uses is:
<div class="container">
	<script type="text/ng-template" id="deleteTemplate.html">
        <div class="modal-header">
            <h3 class="modal-title">Confirm Delete!</h3>
        </div>
        <div class="modal-body">
            Are you sure you want to delete bookmark <span style="color: green; font-weight: bold"></span>
        </div>
        <div class="modal-footer">
            <button class="btn btn-primary" type="button" ng-click="ok()">OK</button>
            <button class="btn btn-warning" type="button" ng-click="cancel()">Cancel</button>
        </div>
	</script>

	<div class="width300">
		<ul class="nav nav-tabs">
			<li role="presentation" ng-class="{active: listActive}"><a href="#/list">Bookmarks</a></li>
			<li role="presentation" ng-class="{active: bookmarkActive}"><a href="#/bookmark">Add a new Bookmark</a></li>
		</ul>
		<alert ng-repeat="message in messages" type="" close="closeAlert($index)">  </alert>
	</div>


	<h4>Folders</h4>

	<div class="btn-group" role="group">
		<button type="button" ng-repeat="folder in folders" ng-click="getBookmarksInFolder(folder.name)" class="btn btn-default">
			 <span class="badge"></span>
		</button>
	</div>

	<h4 class="bkm-header" ng-show="bookmarks.length > 0">
		Bookmarks in [<span style="color: green"></span>]
	</h4>
	<!-- 	</div> -->

	<div ng-repeat="bookmark in bookmarks" class="panel panel-default bkmpanel">
		<div class="panel-heading">
			<strong></strong>
		</div>
		<div class="panel-body">
			<a href=></a>
		</div>
		<div class="floated">
			<button ng-click="deleteBookmark(bookmark)" class="btn btn-danger btn-sm">Delete</button>
			<button ng-click="editBookmark(bookmark)" class="btn btn-info btn-sm">Edit</button>
		</div>


	</div>


</div>
In the template file, functions and objects declared in the js file are referenced in the common
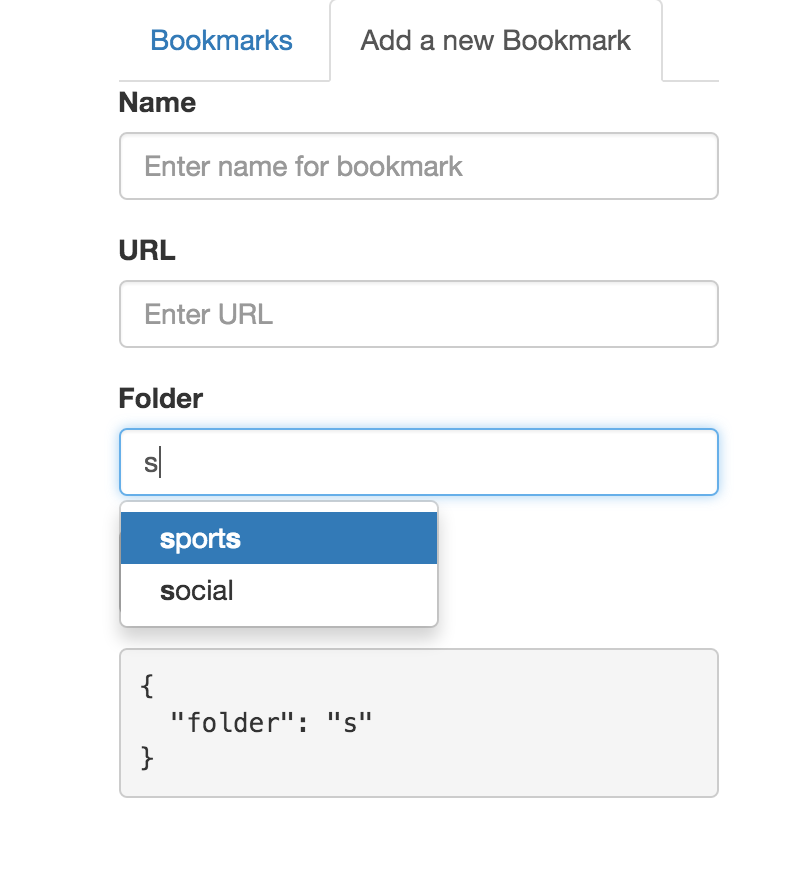
MVC Angular way. Special Bootstrap classes make much more attractive our UI. Angular helps us accomplish functionality which would require much more Js + CSS work. One example is the typeahead feature of Angular for the folder name:
<label>Folder </label> <input type="text" ng-model="bookmark.folder"
	typeahead="folder.name for folder in folders | filter: $viewValue: startsWith" class="form-control"
	placeholder="Start typing for a folder">
when the user starts writing the name of the folder then the already created folder names starting from the typed characters appear in a dropdown list:
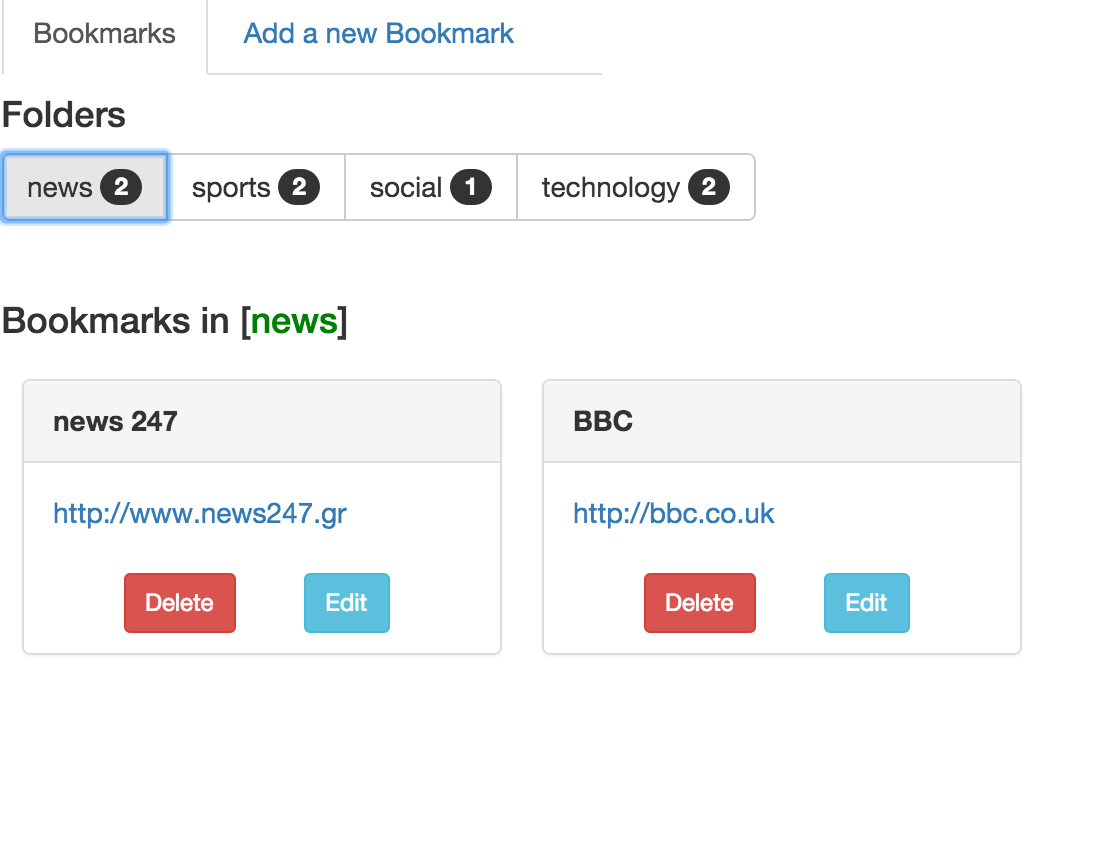
Another very nice thing is that there already a lot of ready to use Bootstrap components that with simple copy past can be cusomised easily. One such example is class badge with which you can inform the use how many bookmarks exist in one folder:
        <button type="button" ng-repeat="folder in folders" ng-click="getBookmarksInFolder(folder.name)" class="btn btn-default">
		 <span class="badge"></span>
        </button>
The result:
Conclusion
Building Web apps on the Java space has never been easier even for a backend developer. Spring Boot makes building RESTFUL APIs piece of cake and the same is done in the front end with frameworks like Angular and Bootstrap. As always of course someone needs to know the important stuff of all the underlying technologies like Java, Javascript, Html/CSS and Javascript. It is just that now the level of abstraction a developer is working with has been shifted upwards removing details and focusing on the important things. Full source code is available at github.
View or add comments
22 Jul 2015
Intoduction
Having done quite a lot of work with FitNesse the last months, i came to really appreciate the usefulness and big practical wins you gain by using it. Some of them are the following:
- Great improvement of collaboration between developers and business analysts. Since everything happens on the web anybody has immediate access to test suites and scenarios and can exercise the code as would like so.
- Pushing the team into the correct direction of specification by example development as first drafts of the tests and the expected results can be put online prior to any code written. Some people like to call this ATDD (Acceptance Test Driven Development)
- Using the excellent interoperability with Excel files the test suites can be edited in an Excel file which let’s be honest is the preferable tool of a Business Analyst.
- As an ongoing bug tracking system where a particular Section can be associated with bugs where a problematic input causes a wrong output which can be assigned to a developer. After the fix is deployed and verified the test describing the bug moves to the regression test suite.
- A very attractive, and highly customisable as anybody wishes, visualization of how the system should behave on particular inputs by means of colors and easy navigation through the mismatches.
However there is in my humble opinion a small disadvantage which is the initial set up of the FitNesse framework for your applications and some useful tricks that normally need some time and google searching to locate. So in this blog i try to walk you through these by setting up FitNesse for a hypothetical application describing along the way tricks learned.
So lets say we have a minimal application in the form of jar or classes folder which displays statistics for user’s transactions per month and per spending category. The application is composed by a POJO class describing a transaction
and by a processing class that performs the analysis and returns back maps of information. I used Java 8 streams to refresh also a bit my knowledge of how functional kind of things look like on Java.
// constructor and accessors omitted
public class Transaction {
	String name;
	BigDecimal amount;
	String category;
	Date date;
}

// accessors omitted
public class Calculate {
	static SimpleDateFormat DATEFORMAT = new SimpleDateFormat("dd/MM/yy");

	private List<Transaction> transactions;
	private Map<String, Map<Object, BigDecimal>> totalPerPersonPerMonth;
	private Map<String, Map<Object, BigDecimal>> totalPerPersonPerCategory;
	private Map<String, BigDecimal> totalAmountPerPerson;

	public Calculate(List<Transaction> transactions) {
		this.transactions = transactions;
	}

	public void run() {
		totalAmountPerPerson = transactions.stream().collect(
				groupingBy(Transaction::getName, sumUpAmount()));

		System.out.println("totalAmountPerPerson: " + totalAmountPerPerson);

		totalPerPersonPerMonth = transactions.stream().collect(
				groupingBy(Transaction::getName, groupingBy(trans -> {
					return getMonth(trans.getDate());
				}, sumUpAmount())));

		System.out.println("totalPerPersonPerMonth: " + totalPerPersonPerMonth);

		totalPerPersonPerCategory = transactions.stream().collect(
				groupingBy(Transaction::getName, groupingBy(trans -> {
					return trans.getCategory().toUpperCase();
				}, sumUpAmount())));

		System.out.println("totalPerPersonPerCategory: "
				+ totalPerPersonPerCategory);
	}

	private Collector<Transaction, ?, BigDecimal> sumUpAmount() {
		return mapping(Transaction::getAmount,
				reducing(BigDecimal.ZERO, (a, b) -> a.add(b)));
	}

	public Month getMonth(Date date) {
		Calendar cal = Calendar.getInstance();
		cal.setTime(date);
		int mon = cal.get(Calendar.MONTH);
		return Month.of(mon + 1);
	}
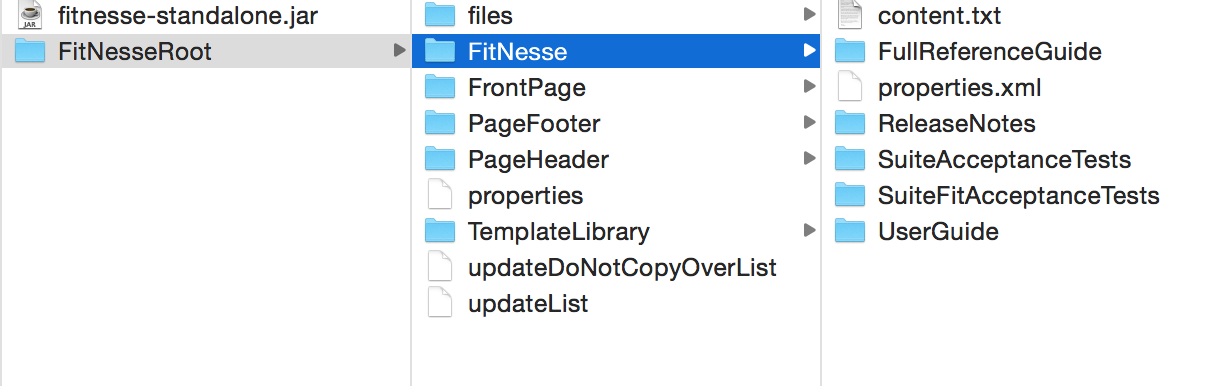
Now that we have our small application we go and download FitNesse which is just a jar (fitnesse-standalone.jar).
Execute the jar by specifying which port you would like FitNesse to listen on.
java -jar fitnesse-standalone.jar -p 8080
Now FitNesse extracts basically a folder FitNesseRoot where it puts all its files. Navigate to the host and port where FitNesse is running and you will see the following:
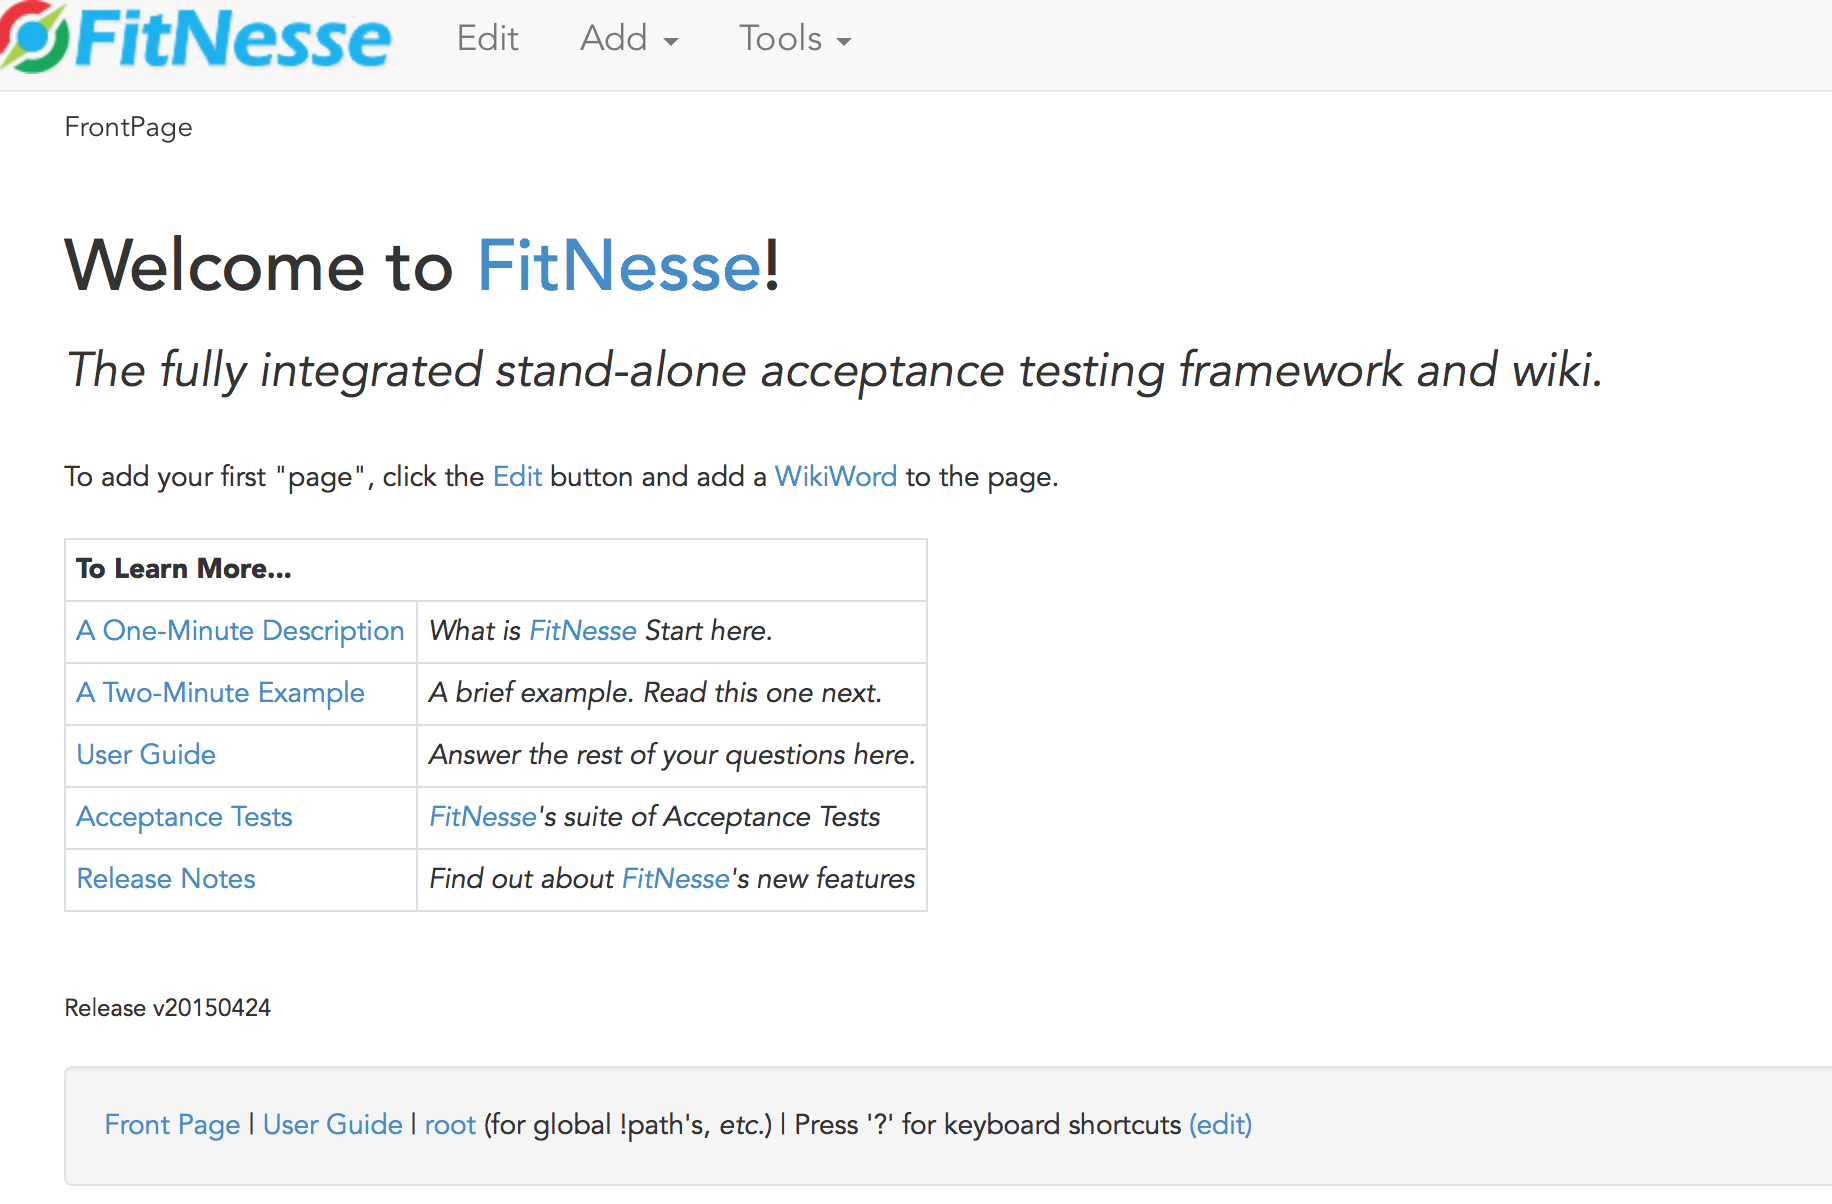
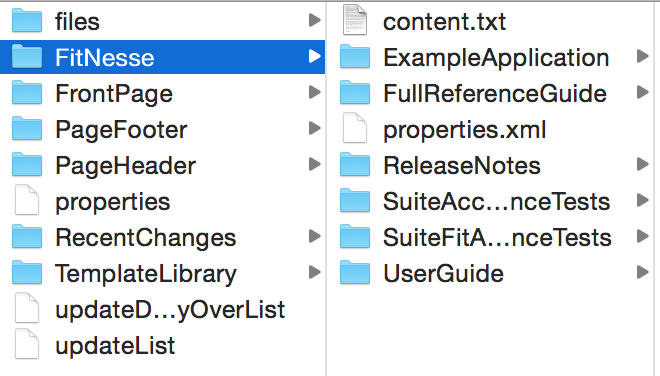
The initial file structure is the following and as you can see if you hover over the links in the initial page there is a one to one mapping between the links and the folders. For example link User Guide maps to FitNesse/UserGuide folder.
Proceeding as the suggestion in the initial page, we click edit and we add 2 lines for our application:
| '''My Applications...''' |
| [[Simple Example][.FitNesse.ExampleApplication]] | ''My Example application.'' |
Clicking on save now you can see our entry point created but with a ? on the right. This is because the corresponding files have not been created yet. Clicking on the ‘?’ opens an editpage with a default fitnesse command (which basically fills the page’s contents with the contents of its subdirectory)
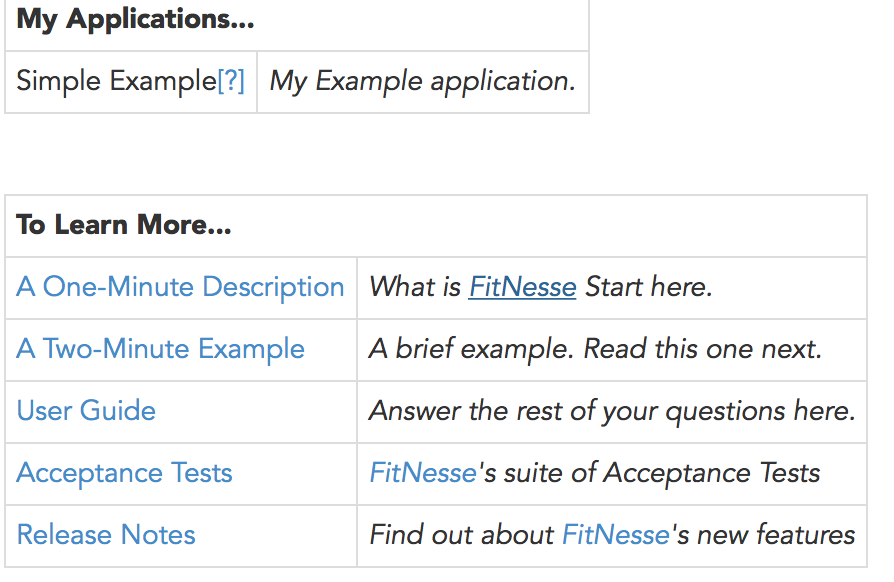
After edit/save we navigate again to the root page and we get:
Clicking on our new link again and then selecting edit we add the following:
!contents -R2 -g -p -f -h

!define TEST_SYSTEM {slim}
!define COLLAPSE_SETUP {true}
!define COLLAPSE_TEARDOWN {true}

!path /path/to/classes
!path /path/to/jar
This sets up slim system and how to display included pages and contains all the paths containing application’s and fixture code classes and jars.
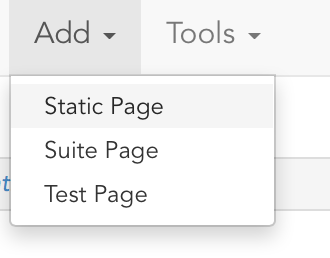
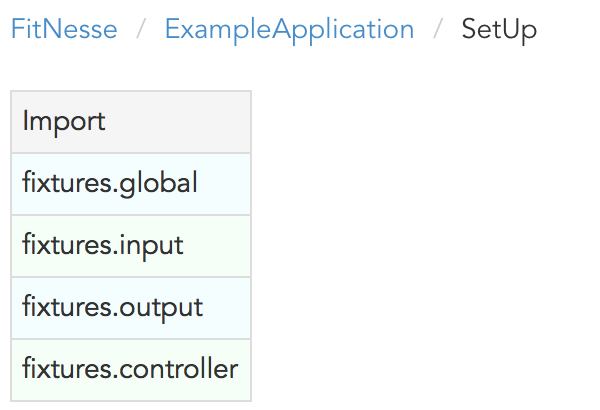
Remaining in the same page we add a new Static page with name SetUp:
This is a file which needs to declare package imports for the fixture classes we will use later on in the test pages. The last line maps directly to an InitializeSystem class which will be explained later.
|Import|
|fixtures.global|
|fixtures.input|
|fixtures.output|
|fixtures.controller|

|Initialize System|
The root page now looks:
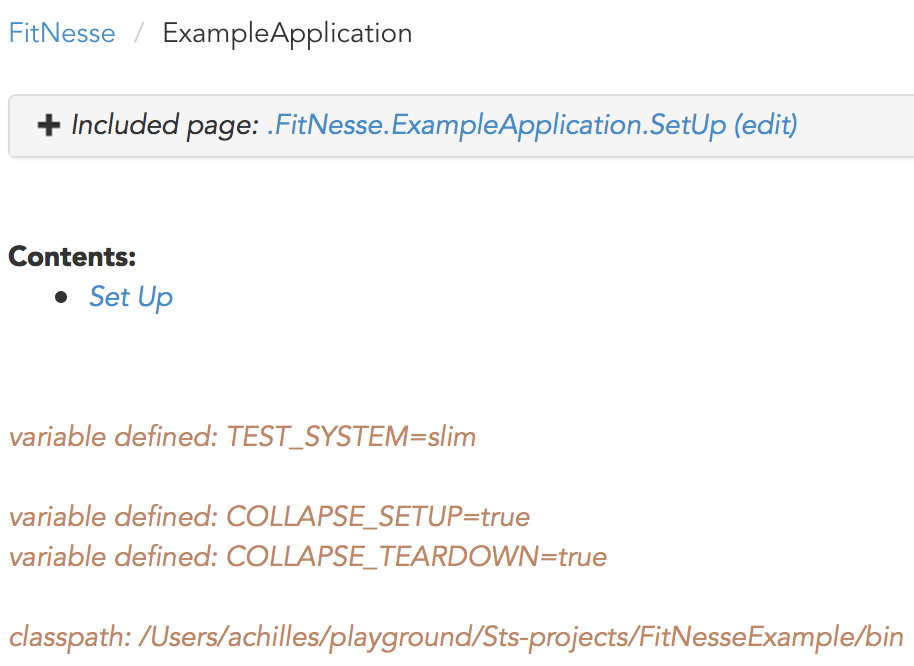
And the included SetUp page is:
After all this initial setup we are ready to start building our fixtures and our tests.
There are a lot of tables provided by FitNesse but in my humble opinion most applications can be easily tested with the following 3 tables using the pattern:
- Input using Decision tables
- Processing using Script tables
- Output verification using Query tables
Starting with the input we will use a decision table to be able to enter the list of transactions. Here is our corresponding fixture.
public class AddTransaction {
	private String name;
	private BigDecimal amount;
	private String category;
	private Date date;

	public void execute() {
		Transaction transaction = new Transaction(name, amount, category, date);
		Repository.getInstance().getTransactions().add(transaction);
		System.out.println("added: " + transaction);
	}

	public boolean isAdded() {
		return true;
	}

    //getters
    //setters
Our fixture class uses the same field names with our POJO. Setters in a fixture class are called
whenever the property is defined as a table header. These setters run for every row and then after that the execute method runs which basically in our fixture code all that it does, is adding this new Transaction created in a global Repository object which contains data to be reused later on from other fixture classes (script table, query table). Nothing to worry about concurrency issues regarding this global state holding object as each time you click test, FitNesse kicks off a new JVM process, so concurrent Tests run on separate virtual machines. Last feature of a desicion table is to added accessor methods which execute after the execute method if there is a column with the same name end a ? at the end (we won’t use it anyway).
Repository is a simple singleton object:
public class Repository {

	private static Repository instance;
	List<Transaction> transactions = new ArrayList<>();

	public static void refresh() {
		instance = new Repository();
	}

	public static Repository getInstance() {
		return instance;
	}

	public void setTransactions(List<Transaction> transactions) {
		this.transactions = transactions;
	}

	public List<Transaction> getTransactions() {
		return transactions;
	}
There exists inside this class also a refresh method which creates a new object so that we start with a fresh Repository containing its test data (quite useful when we execute a test suite). This refresh method is called by the InitializeSystem class mentioned before which as is included to run in the SetUp page is running before any test.
public class InitializeSystem {
	public InitializeSystem() {
		Repository.refresh();
	}
}
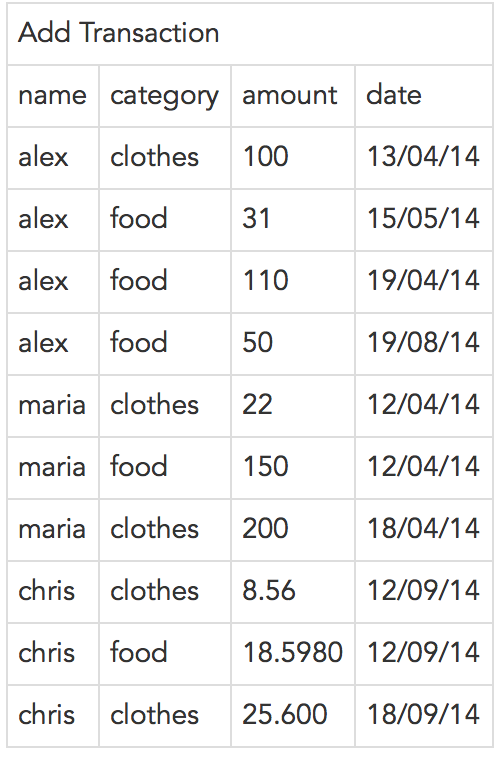
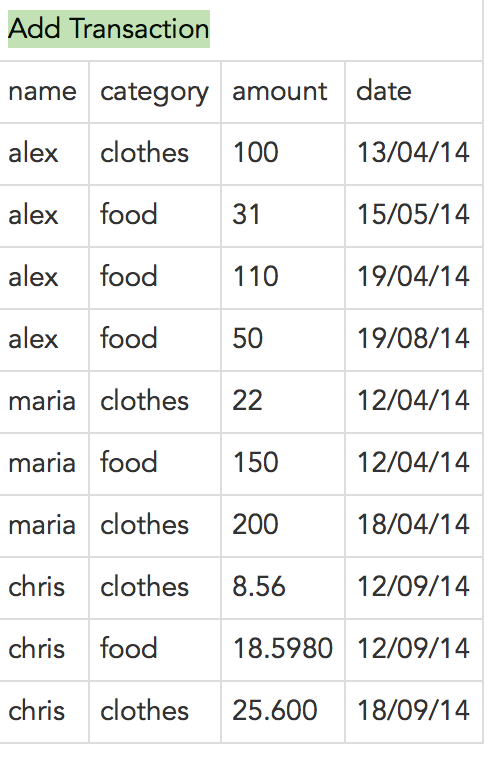
Now we are ready to create our first test using only the input fixture. Navigate to the root app page and add a test page from the menu with name TestAddTransactions. Then we enter the following:
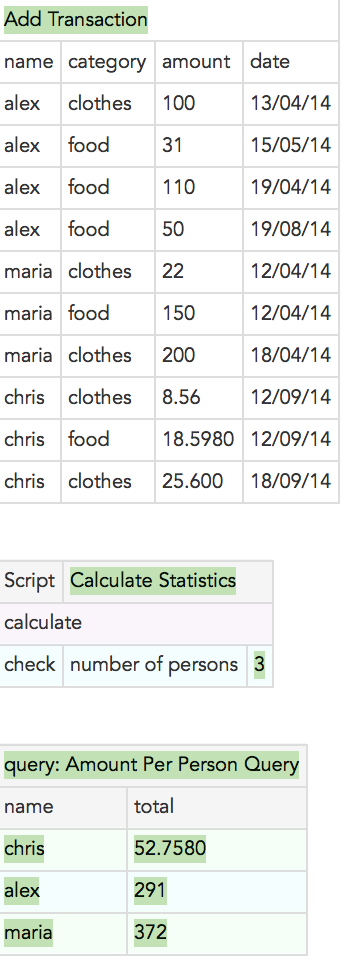
!|Add Transaction               |
|name  |category|amount|date    |
|alex |clothes |100    |13/04/14|
|alex |food    |31     |15/05/14|
|alex |food    |110    |19/04/14|
|alex |food    |50     |19/08/14|
|maria|clothes |22     |12/04/14|
|maria|food    |150    |12/04/14|
|maria|clothes |200    |18/04/14|
|chris|clothes |8.56   |12/09/14|
|chris|food    |18.5980|12/09/14|
|chris|clothes |25.600 |18/09/14|
| This is a simple desicion table and the header is always of type ! |
name of the class |
. Saving the page we have the following screen: |
Now we can run the test but we get problems:
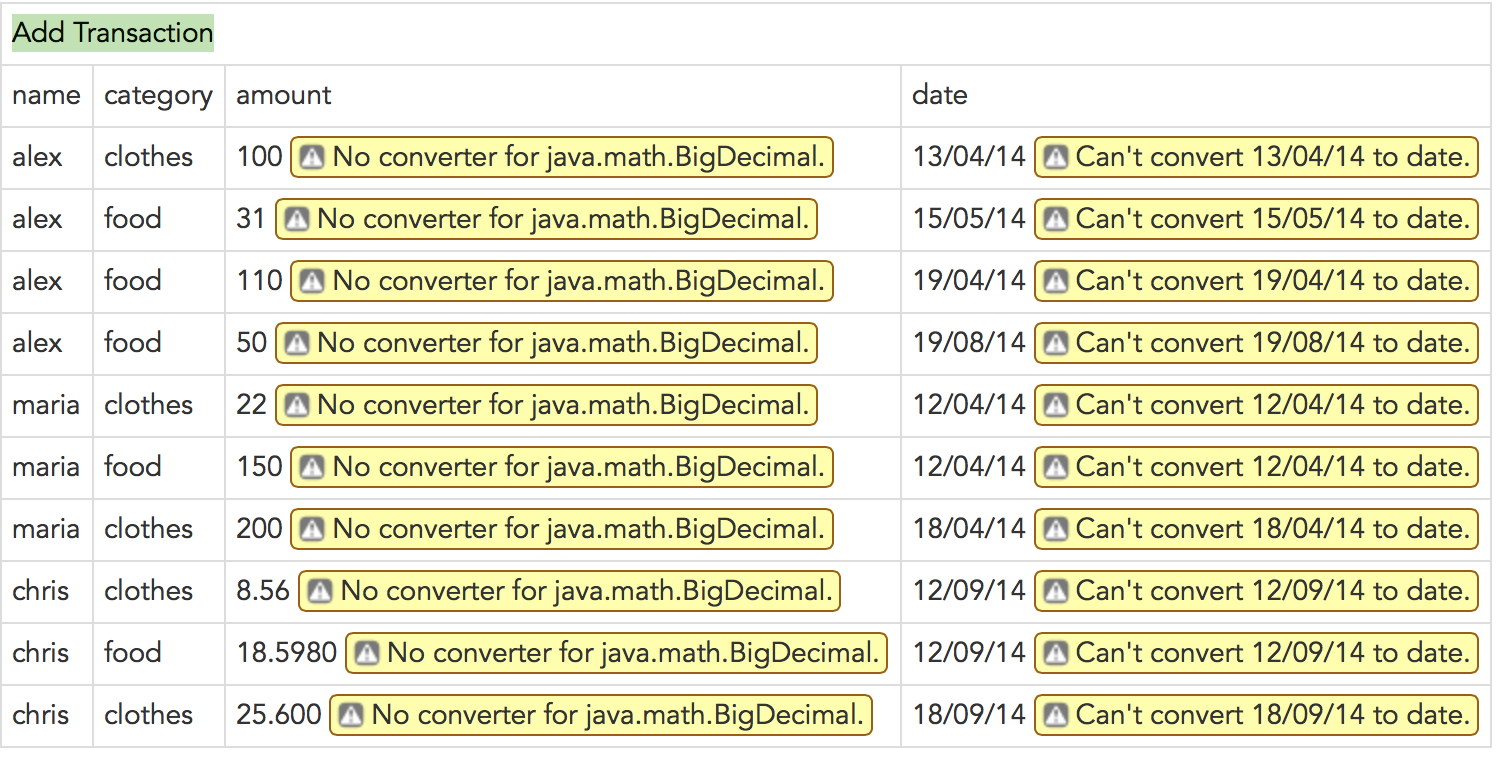
Reason for these problems is that there are no converters from the text type of the scripts to the BigDecimal and Date types that are required (as arguments in their setters methods) for fields amount and date. The 2 missing converters are the following:
public class BigDecimalConverter implements Converter<BigDecimal> {

	@Override
	public BigDecimal fromString(String arg0) {
		if (arg0 != null && !arg0.isEmpty())
			return new BigDecimal(arg0);
		return null;
	}

	@Override
	public String toString(BigDecimal arg0) {
		return arg0.toString();
	}

}

public class MyDateConverter implements Converter<Date> {

	SimpleDateFormat DATEFORMAT = new SimpleDateFormat("dd/mm/yy");

	@Override
	public Date fromString(String arg0) {
		if (arg0 != null) {
			try {
				return DATEFORMAT.parse(arg0);
			} catch (ParseException e) {
				// TODO Auto-generated catch block
				e.printStackTrace();
			}
		}
		return null;
	}

	@Override
	public String toString(Date arg0) {
		// TODO Auto-generated method stub
		return null;
	}

}
And we need also to register them in the InitializeSystem:
public InitializeSystem() {
		fitnesse.slim.converters.ConverterRegistry.addConverter(
				BigDecimal.class, new BigDecimalConverter());

		fitnesse.slim.converters.ConverterRegistry.addConverter(Date.class,
				new MyDateConverter());

		Repository.refresh();
	}
With these changes we get success and we run Test again and get green:
Since now we have our input read and set into the repository we continue with the module calculation invocation.
For that we will use a script table which is a table where each row is a single instruction in the script.
Script tables are represented by !| Script|Name of the class|optional constuctors arguments|
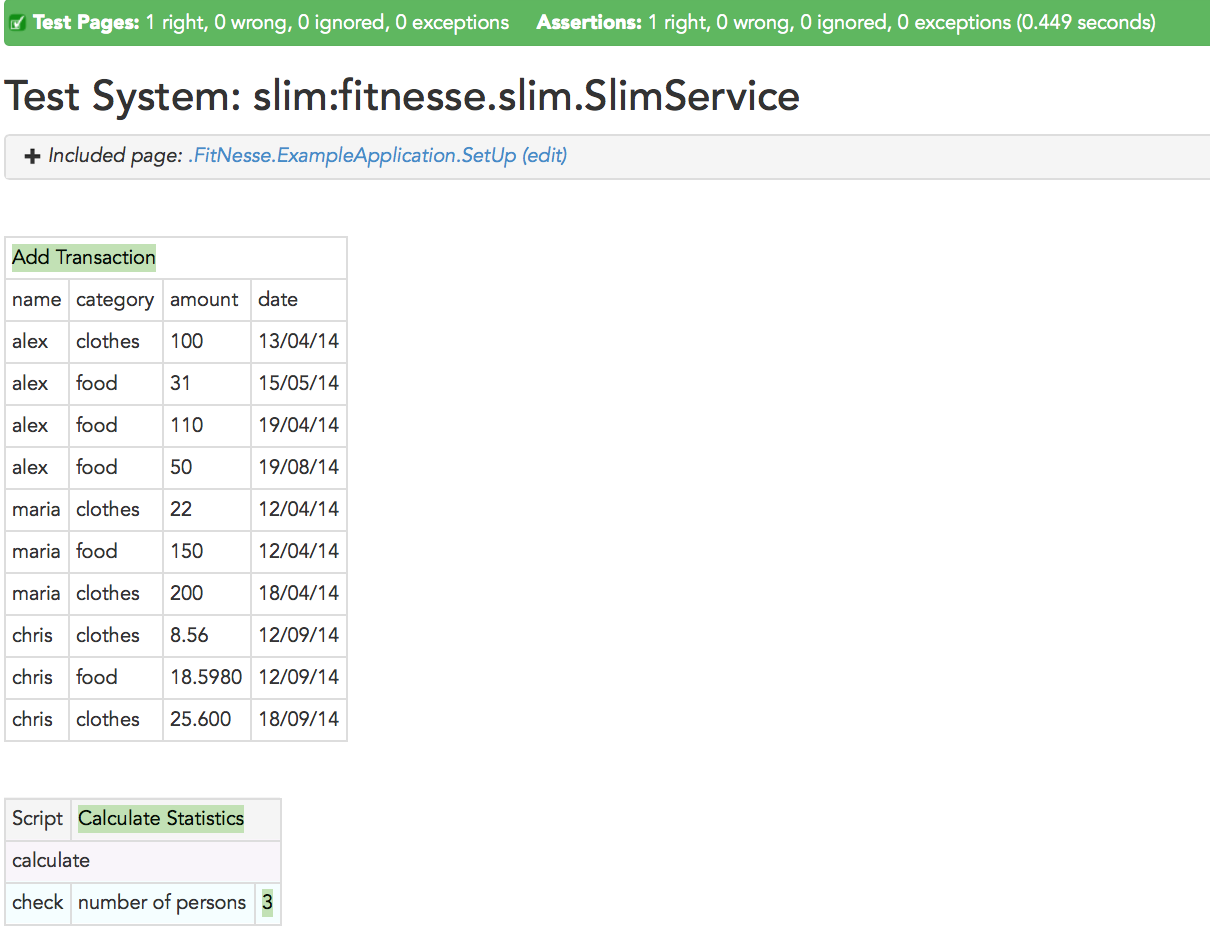
!|Script|Calculate Statistics|
|calculate                   |
|check  |number of persons |3|
Adding the above and pressing Test will give us the following. The check primitive at the end is a FitNesse command which
after invoking the method numberOfPersons in our Fixture, verifies that the value is 3 (distinct persons in our transactions)
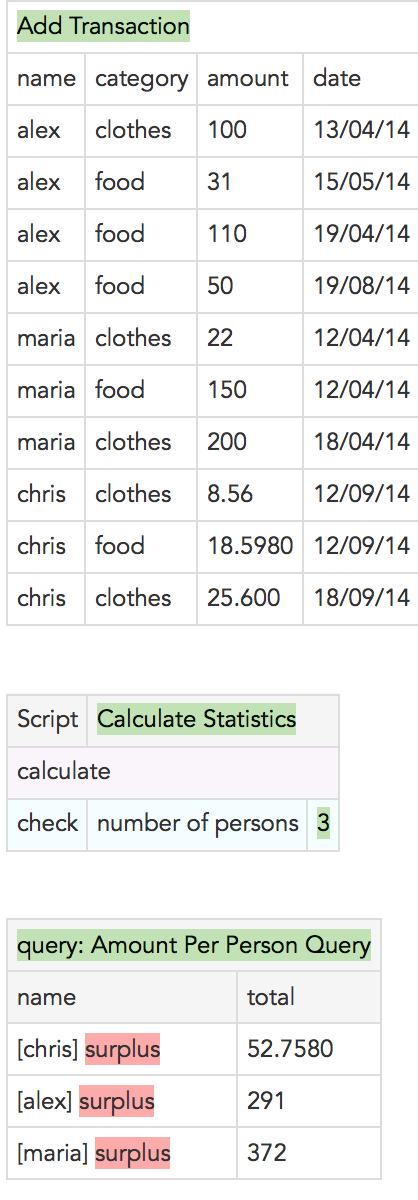
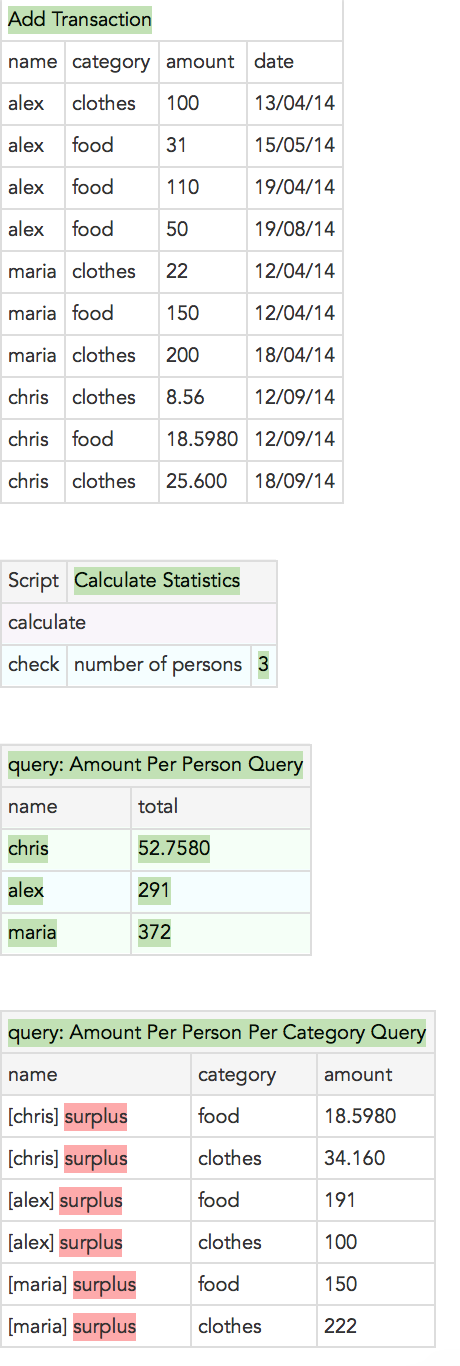
Next and final step is to verify the correctedness of the results. Since our results exist in collections, a natural fit for our verification table is a query table. This fixture needs to create a list for every result row containing lists of 2 items containing the column name and the correspnding value. This structure then is compared with the expected records we have in out test script. A great feature of this table is that we can even avoid having expected results and in this case we will get the actual records marked as surplus of course.
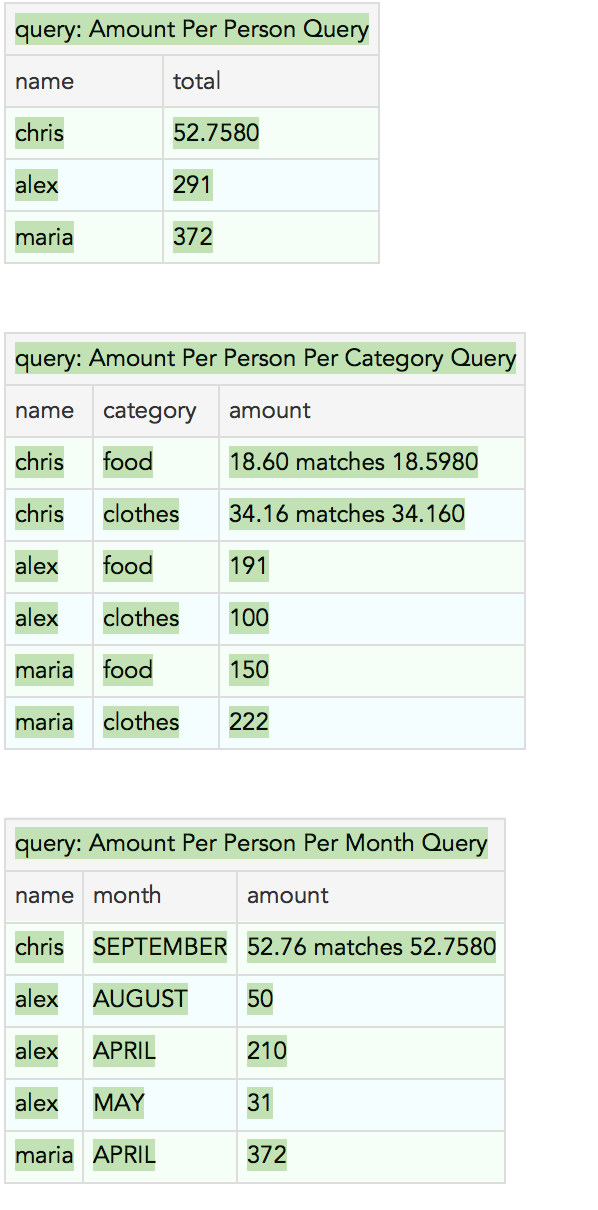
Our query table for the total per person results is the following (Query tables are identified by the word query followed by a colon and the name of the fixture class):
!|query: Amount Per Person Query|
|name|total|
In the above as you can see we haven’t specified any expected result yet as we are bored to do the calculations by hand ;)
The fixture class needed for this case can be any class with a method signature of:
public List<Object> query()
acting as an adaptor basically between the application’s results and the FitNesse expected tabular form.
In detail our fixture for this is:
public class AmountPerPersonQuery {

	public List<Object> query() {

		LinkedList<Object> allResults = new LinkedList<Object>();

		Map<String, BigDecimal> totalPerPerson = Repository.getInstance()
				.getTotalAmountPerPerson();

		if (totalPerPerson != null) {
			for (String each : totalPerPerson.keySet()) {
				allResults.add(asList(
                            asList("name", each),
                            asList("total", totalPerPerson.get(each))));
			}

		}

		return allResults;
	}
}
Notice the 2 column names we used in the code representing the first item of the nested lists inside the row representing list.
Running oour test we get the 3 ‘surplus’ rows as we haven’t specified anything for expected results.
Now that we know the results lets put them in out test so that we get the well deserved green for our good work:
!|query: Amount Per Person Query|
|name          |total           |
|chris         |52.7580         |
|alex          |291             |
|maria         |372             |
And indeed running the test again we get:
Similarly for the amount per person per category results we define the following query table:
!|query: Amount Per Person Per Category Query|
|name        |category        |amount        |
with the corresponding fixture class:
public class AmountPerPersonPerCategoryQuery {

	public List<Object> query() {

		LinkedList<Object> allResults = new LinkedList<Object>();

		Map<String, Map<Object, BigDecimal>> totalPerPersonPerCategory = Repository.getInstance()
				.getTotalPerPersonPerCategory();

		if (totalPerPersonPerCategory != null) {
			for (String person : totalPerPersonPerCategory.keySet()) {
				Map<Object, BigDecimal> amountPerCategory = totalPerPersonPerCategory.get(person);
				for (Object category: amountPerCategory.keySet()) {
					allResults.add(asList(
                        asList("name", person),
                        asList("category", category),
                        asList("amount", amountPerCategory.get(category))));
				}
			}

		}

		return allResults;
	}
}
and our test now when runs looks like:
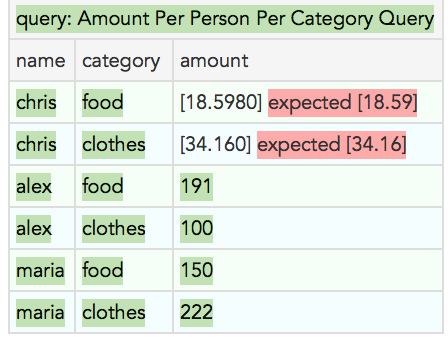
Let’s proceed by adding again the expected results but let’s take it a step further by noticing that in the last test we had a result with 4 decimal digits for the first record. This is something we would like to ignore as 2 decimal digits is enough for us and the rest just noise.
As before we add the expected results but with up to 2 decimal digits this time:
!|query: Amount Per Person Per Category Query|
|name         |category        |amount       |
|chris        |food            |18.59        |
|chris        |clothes         |34.16        |
|alex         |food            |191          |
|alex         |clothes         |100          |
|maria        |food            |150          |
|maria        |clothes         |222          |
As expected we have failures:
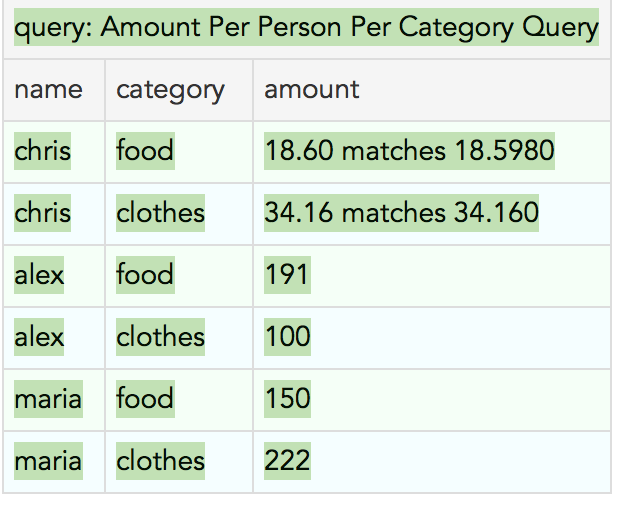
To solve this problem we need to add a so called custom comparator and register it inside a file named plugins.properties in the same folder where FitNesse starts. This comparator will basically match BigDecimals up to the 2nd decimal digit.
public class BigDecimalComparator implements CustomComparator {
	private static final int SCALE_BY = 2;

	@Override
	public boolean matches(String arg0, String arg1) {
		return round(arg0).equals(round(arg1));
	}

	public BigDecimal round(BigDecimal value) {
		return value.setScale(SCALE_BY, RoundingMode.HALF_EVEN);
	}

	public BigDecimal round(String value) {
		return round(new BigDecimal(value));
	}
}
Then we create a plugins.properties and we put inside there the prefix for our comparator and its full class name:
CustomComparators = decimal2:fixtures.global.BigDecimalComparator (we can also add more using commas)
Next we need to restart FitNesse to add to our test, wherever we want this comparator to take effect, its prefix before the expected number.
Also now since we need to have available in the classpath the classes that we declare as custom comparators, we need to chnage the way we start FitNesse and use -cp and not -jar as with the -jar option the -cp one is ignored. Therefore now we need to run fitnesse using:
java -cp "paths-to-jar-or-classes-folders-of-comparators;fitnesse-standalone.jar" fitnesseMain.FitNesseMain -p 8080
Our final query table is:
!|query: Amount Per Person Per Category Query|
|name      |category     |amount             |
|chris     |food         |decimal2:18.60     |
|chris     |clothes      |decimal2:34.16     |
|alex      |food         |191                |
|alex      |clothes      |100                |
|maria     |food         |150                |
|maria     |clothes      |222                |
Rerun the Test and we get:
Adding in a similar way the last query table we get the final run:
Summary
FitNesse is an excellent tool with many many options of which i believe the above described are sufficient for a great deal of applications. Most attractive to me is that it can easily involve into Acceptance Test Driven approaches, critical stakeholders of the application and so improve at the end your software quality. Business analysts can hit the FitNesse url and drive the development forward by providing test scenarios or they can even work just by using Excel if you use the excellent Export to Excel menu option of FitNesse!
All source code and FitNesse files of the above example are here.
View or add comments
12 Jul 2015
Before some months there was everywhere on internet a math problem regarding Cheryl’s birthday.
Since i was studying Akka and was really intrigued by its wonderful human-like way of solving problems (which by the way solves also all your concurrency problems as well) using simple request-response messages so i wrote a simple Akka program to solve the problem.
In summary the problem is the following (see wikipedia description):
Albert and Bernard just became friends with Cheryl, and they want to know when her birthday is. Cheryl gives them a list of 10 possible dates:
- May: 15, 16, 19
- June: 17, 18
- July: 14, 16
- August: 14, 15, 17
Cheryl tells Albert and Bernard separately the month and the day of her birthday respectively. And then we have the following dialog between Albert and Bernard.
- Albert: I don’t know when Cheryl’s birthday is, but I know that Bernard doesn’t know too.
- Bernard: At first I don’t know when Cheryl’s birthday is, but I know now.
- Albert: Then I also know when Cheryl’s birthday is.
So when is Cheryl’s birthday?
First the main app follows, which basically represents Cheryl who sends both to Albert and Bernard the initial StartMessage encapsulating
the following data:
- a list of tuples representing the available dates
- the day to Bernard and the month to Albert
- references to ecah other so that then they can have their own dialog
import akka.actor._

object FindSolutionApp extends App {
  val system = ActorSystem("FindSolutionAppSystem")
  val albert = system.actorOf(Props[Albert], name = "albert")
  val bernard = system.actorOf(Props[Bernard], name = "bernard")

  val dates = (15, "May") ::(16, "May") ::(19, "May") ::(17, "Jun")
    ::(18, "Jun") ::(14, "Jul") :: (16, "Jul") ::(14, "Aug")
    ::(15, "Aug") ::(17, "Aug") :: Nil

  println("App -> Start to Bernard")
  bernard ! StartBernard(16, dates, albert)

  println("App -> Start to Albert ")
  albert ! StartAlbert("Jul", dates, bernard)

  Thread.sleep(2000);
  system.shutdown()

}
The messages exchanged are
class StartMessage(dates: List[(Int, String)])

case class StartBernard(day: Integer, dates: List[(Int, String)],
    albert: ActorRef) extends StartMessage(dates)

case class StartAlbert(month: String, dates: List[(Int, String)],
    bernard: ActorRef) extends StartMessage(dates)

case object No

case object BothNo

case object Found

case object FoundWithHelp
Actor representing Bernard waits initially only a StartBernard message and after it arrives, it processes and either finishes if the birthday is found or continues exchanging message to Albert and changing receive state so as to wait for further communication from Albert.
class Bernard extends Actor {
  var matchingDates: List[(Int, String)] = Nil
  var monthsOfUniqueDays: Iterable[String] = Nil

  def receive = {
    case StartBernard(day, dates, albertRef) => {
      println("Bernard received Start")
      // finds and saves the List of months cotaining unique days
      monthsOfUniqueDays = getMonthsHavingUniqueDay(dates)
      // finds and saves the matching dates given the input day
      matchingDates = dates.filter(_._1 == day)
      matchingDates.length match {
        case 1 => {
            println("Bernard found: "
                + matchingDates.map {
                    case ((k, v)) => k + ", " + v }
                .head)
            println("Bernard -> Found to Albert")
            albertRef ! Found
            context.stop(self)
        }
        case 0 => {
            println("Invalid Input not existing day in input list ")
            println("Bernard -> No to Albert")
            albertRef ! No
        }
        case _ =>
      }
      context.become(waitResponseFormAlbert, true)
    }
  }

  def waitResponseFormAlbert: Receive = {
    case BothNo => {
      println("Bernard received BothNo")
      //means that no month belonging to unique day month list was given to Albert
      // so we need to filter out from the matching dates all the possible months containing unique days
      val filterOutUniqueMonths = matchingDates.filterNot(
        tuple => monthsOfUniqueDays.exists(_ == tuple._2))
      // in case length is 1 we found it
      filterOutUniqueMonths.length match {
        case 1 => {
          println("Bernard found: "
            + filterOutUniqueMonths.map {
                case ((k, v)) => k + ", " + v }
                .head)
          println("Bernard -> FoundWithHelp to App")
          sender ! FoundWithHelp
          context.stop(self)
        }
        case _ => {
          println("Bernard cannot find: " + filterOutUniqueMonths)
          println("Bernard -> No to App")
          sender ! No
        }
      }
    }

    case No =>
      println("Bernard received No")
  }
}
Actor representing Albert similarly waits only a StartAlbert message initially and after it arrives, it processes and either finishes if the birthday is found or continues exchanging message to Bernard and changing receive state so as to wait for further communication from Bernard.
class Albert extends Actor {
  var matchingDates: List[(Int, String)] = Nil
  var allDates: List[(Int, String)] = Nil
  var sentOtherAlsoNo = false
  var inputMonth: String = ""

  def receive = {

    case StartAlbert(month, dates, bernard) => {
      println("Albert received Start")
      allDates = dates
      inputMonth = month
      // finds and saves the matching dates given the input month
      matchingDates = dates.filter(p => p._2 == month)
      matchingDates.length match {
        case 1 => {
          println("Albert found: " +
            matchingDates.map {
                case ((k, v)) => k + ", " + v }
            .head)
          println("Albert -> Found to Bernard")
          bernard ! Found
          context.stop(self)
        }
        case 0 => {
          println(s"Invalid Input not existing $month in input list ")
          println("Albert -> No to Bernard")
          bernard ! No
        }
        case _ => {
          println("Albert -> BothNo to Bernard")
          bernard ! BothNo
        }
      }
      //after the StartMessage processing, change receiving state
      context.become(waitResponseFormBernard, true)
    }


  }

  def waitResponseFormBernard: Receive = {
    case FoundWithHelp => {
      println("Albert received FoundWithHelp")
      val monthsOfUniqueDays = getMonthsHavingUniqueDay(allDates)

      // filter out months of unique days as Bernard found it
      // but with help meaning it couldn't find it without help.
      val remainingValidDates = allDates.filterNot(
        tuple => monthsOfUniqueDays.exists(_ == tuple._2))
      val uniqueRemaining = remainingValidDates.groupBy(_._1)
                            .map {
                                case (k, v) => (k, v.map(_._2)) }
                            .filter(_._2.length == 1)
      // filter from matching dates only the remaining valid dates
      // and if this is 1 then we found it
      matchingDates = matchingDates.filter(
        each => uniqueRemaining.exists(p => p._1 == each._1))
      if (matchingDates.length == 1)
        println("Albert found: " +
            matchingDates.map {
                case ((k, v)) => k + ", " + v }
                    .head)
      else
        println("Albert cannot find it")
    }

    case Found => {
      println("Albert received Found")
      // should be unique since the other found it without help
      val found = allDates.groupBy(_._1)
        .map { case (k, v) => (k, v.map(_._2)) }
        .filter(_._2.length == 1)
        .filter(month => month._2.contains(inputMonth))
        .map { case (k, v) => k + ", " + v.head }

      if (found.size == 1)
        println(s"Albert found also ${found.head}")
    }

    case No =>
      println("Albert received No")

    case BothNo =>
      println("Albert received BothNo")

  }
}
a simple utility object has been used to return a List of months having unique days
object getMonthsHavingUniqueDay {
  def apply(dates: List[(Int, String)]): Iterable[String] = {
    // map of day to List of Months having this day (foldLeft)
    val monthsListPerDay = (Map[Int, List[String]]() /: dates) {
      (map, x) => map + (x._1 -> (x._2 :: map.getOrElse(x._1, Nil)))
    }

    // filter only the ones which have 1 month in the list
    val filterOnlyUniqueDays = monthsListPerDay.filter(_._2.length == 1)

    // flat map of the remaining list of tuples
    // for the second element (month)
    filterOnlyUniqueDays.flatMap(dayMonths => dayMonths._2)
  }
}
For full details and the source code please check: source code
Running the program for the correct answer 16 Jul prints the following self-describing information about the flow of messages:
- App -> Start to Bernard
- App -> Start to Albert
- Bernard received Start
- Albert received Start
- Albert -> BothNo to Bernard
- Bernard received BothNo
- Bernard found: 16, Jul
- Bernard -> FoundWithHelp to App
- Albert received FoundWithHelp
- Albert found: 16, Jul
Running the program with another input having a unique day (e.g. 19 May) prints the following:
- App -> Start to Bernard
- App -> Start to Albert
- Bernard received Start
- Albert received Start
- Albert -> BothNo to Bernard
- Bernard found: 19, May
- Bernard -> Found to Albert
- Albert received Found
- Albert found also 19, May
View or add comments