FitNesse up your application from scratch
22 Jul 2015Intoduction
Having done quite a lot of work with FitNesse the last months, i came to really appreciate the usefulness and big practical wins you gain by using it. Some of them are the following:
- Great improvement of collaboration between developers and business analysts. Since everything happens on the web anybody has immediate access to test suites and scenarios and can exercise the code as would like so.
- Pushing the team into the correct direction of specification by example development as first drafts of the tests and the expected results can be put online prior to any code written. Some people like to call this ATDD (Acceptance Test Driven Development)
- Using the excellent interoperability with Excel files the test suites can be edited in an Excel file which let’s be honest is the preferable tool of a Business Analyst.
- As an ongoing bug tracking system where a particular Section can be associated with bugs where a problematic input causes a wrong output which can be assigned to a developer. After the fix is deployed and verified the test describing the bug moves to the regression test suite.
- A very attractive, and highly customisable as anybody wishes, visualization of how the system should behave on particular inputs by means of colors and easy navigation through the mismatches.
However there is in my humble opinion a small disadvantage which is the initial set up of the FitNesse framework for your applications and some useful tricks that normally need some time and google searching to locate. So in this blog i try to walk you through these by setting up FitNesse for a hypothetical application describing along the way tricks learned.
So lets say we have a minimal application in the form of jar or classes folder which displays statistics for user’s transactions per month and per spending category. The application is composed by a POJO class describing a transaction and by a processing class that performs the analysis and returns back maps of information. I used Java 8 streams to refresh also a bit my knowledge of how functional kind of things look like on Java.
// constructor and accessors omitted
public class Transaction {
	String name;
	BigDecimal amount;
	String category;
	Date date;
}

// accessors omitted
public class Calculate {
	static SimpleDateFormat DATEFORMAT = new SimpleDateFormat("dd/MM/yy");

	private List<Transaction> transactions;
	private Map<String, Map<Object, BigDecimal>> totalPerPersonPerMonth;
	private Map<String, Map<Object, BigDecimal>> totalPerPersonPerCategory;
	private Map<String, BigDecimal> totalAmountPerPerson;

	public Calculate(List<Transaction> transactions) {
		this.transactions = transactions;
	}

	public void run() {
		totalAmountPerPerson = transactions.stream().collect(
				groupingBy(Transaction::getName, sumUpAmount()));

		System.out.println("totalAmountPerPerson: " + totalAmountPerPerson);

		totalPerPersonPerMonth = transactions.stream().collect(
				groupingBy(Transaction::getName, groupingBy(trans -> {
					return getMonth(trans.getDate());
				}, sumUpAmount())));

		System.out.println("totalPerPersonPerMonth: " + totalPerPersonPerMonth);

		totalPerPersonPerCategory = transactions.stream().collect(
				groupingBy(Transaction::getName, groupingBy(trans -> {
					return trans.getCategory().toUpperCase();
				}, sumUpAmount())));

		System.out.println("totalPerPersonPerCategory: "
				+ totalPerPersonPerCategory);
	}

	private Collector<Transaction, ?, BigDecimal> sumUpAmount() {
		return mapping(Transaction::getAmount,
				reducing(BigDecimal.ZERO, (a, b) -> a.add(b)));
	}

	public Month getMonth(Date date) {
		Calendar cal = Calendar.getInstance();
		cal.setTime(date);
		int mon = cal.get(Calendar.MONTH);
		return Month.of(mon + 1);
	}
Now that we have our small application we go and download FitNesse which is just a jar (fitnesse-standalone.jar). Execute the jar by specifying which port you would like FitNesse to listen on.
java -jar fitnesse-standalone.jar -p 8080
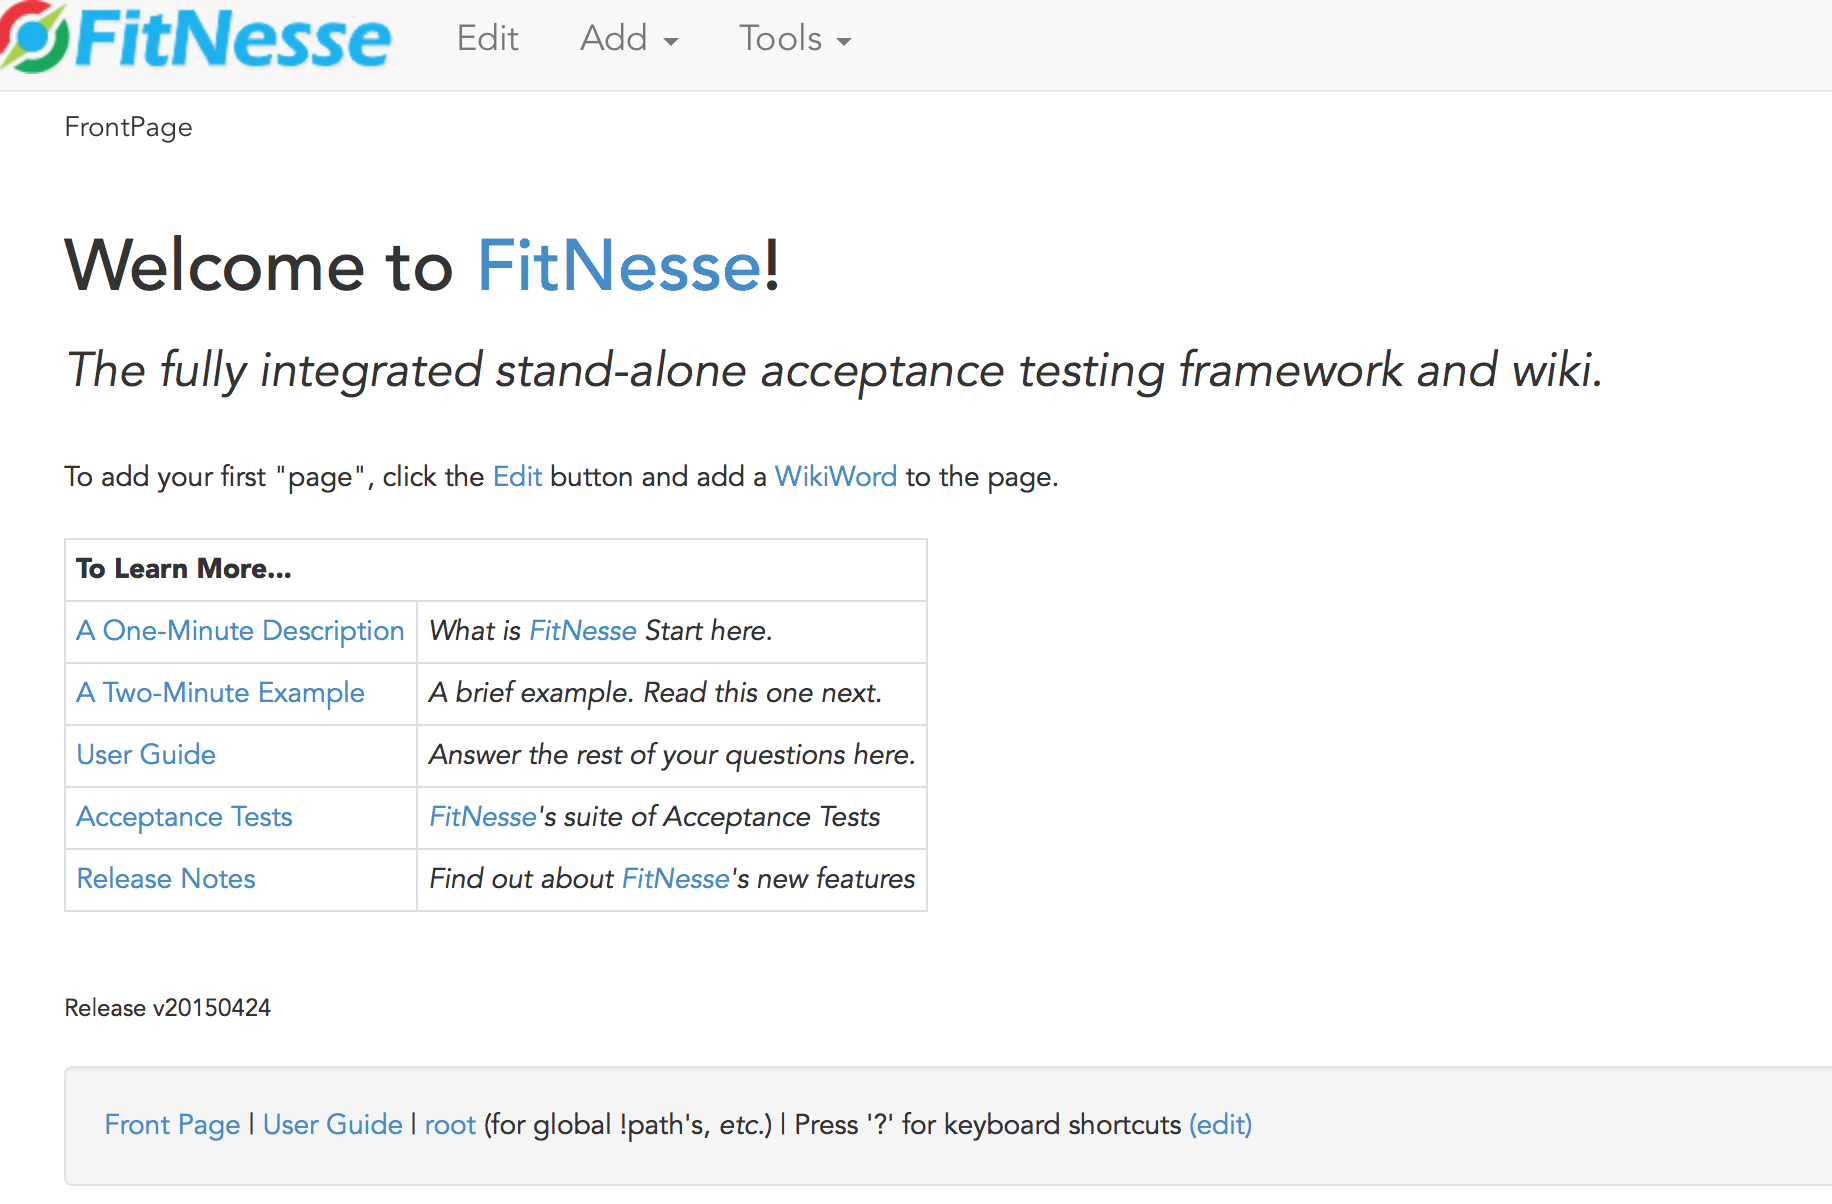
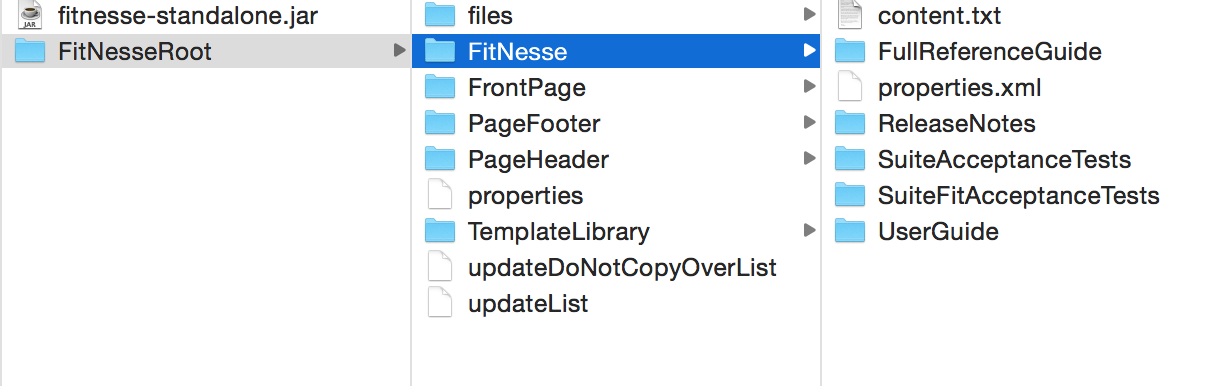
Now FitNesse extracts basically a folder FitNesseRoot where it puts all its files. Navigate to the host and port where FitNesse is running and you will see the following:
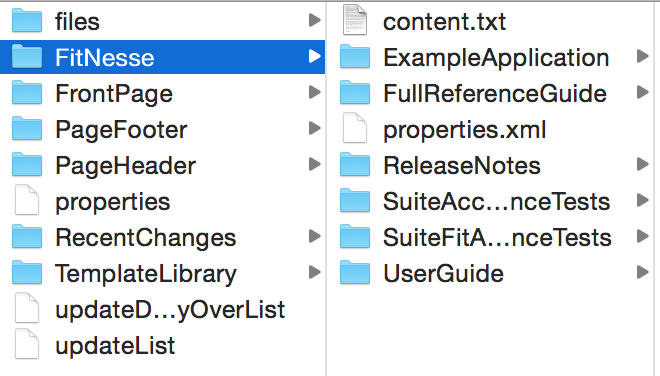
The initial file structure is the following and as you can see if you hover over the links in the initial page there is a one to one mapping between the links and the folders. For example link User Guide maps to FitNesse/UserGuide folder.
Proceeding as the suggestion in the initial page, we click edit and we add 2 lines for our application:
| '''My Applications...''' |
| [[Simple Example][.FitNesse.ExampleApplication]] | ''My Example application.'' |
Clicking on save now you can see our entry point created but with a ? on the right. This is because the corresponding files have not been created yet. Clicking on the ‘?’ opens an editpage with a default fitnesse command (which basically fills the page’s contents with the contents of its subdirectory)
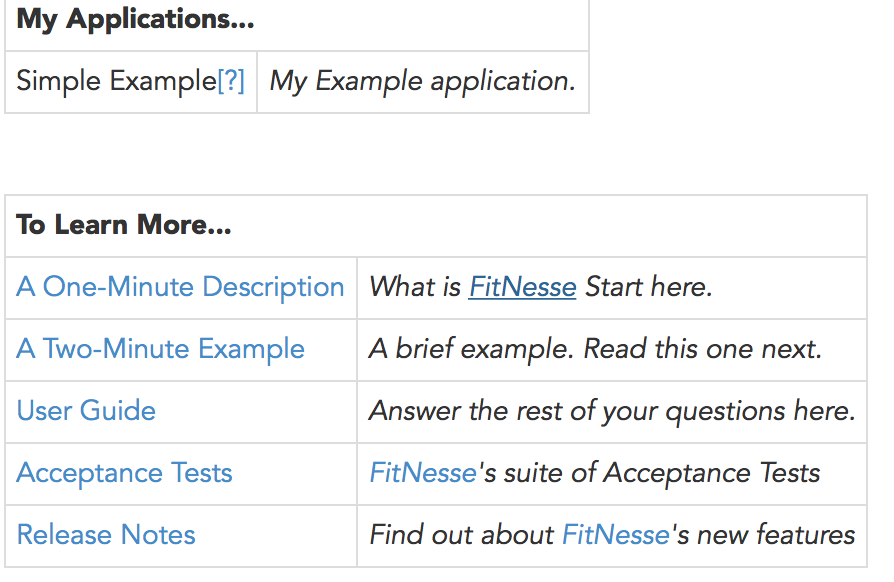
After edit/save we navigate again to the root page and we get:
Clicking on our new link again and then selecting edit we add the following:
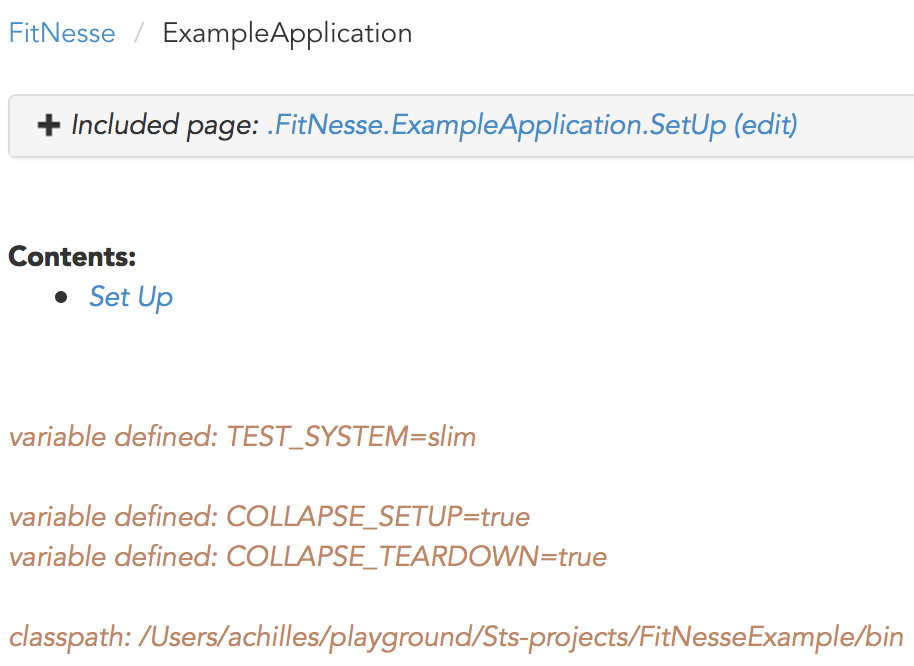
!contents -R2 -g -p -f -h

!define TEST_SYSTEM {slim}
!define COLLAPSE_SETUP {true}
!define COLLAPSE_TEARDOWN {true}

!path /path/to/classes
!path /path/to/jar
This sets up slim system and how to display included pages and contains all the paths containing application’s and fixture code classes and jars.
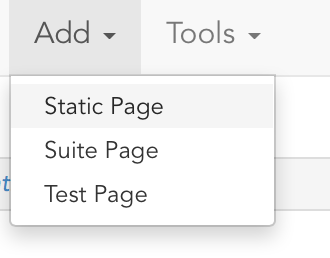
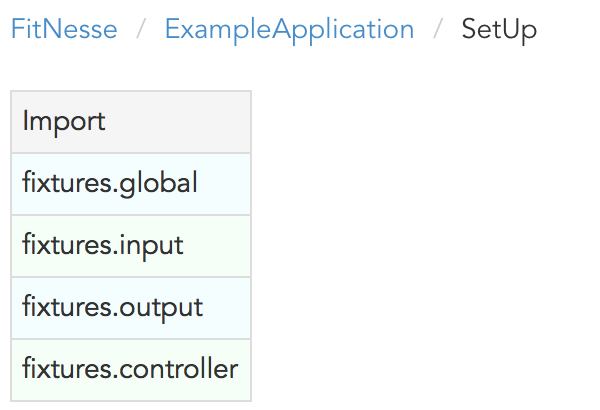
Remaining in the same page we add a new Static page with name SetUp:
This is a file which needs to declare package imports for the fixture classes we will use later on in the test pages. The last line maps directly to an InitializeSystem class which will be explained later.
|Import|
|fixtures.global|
|fixtures.input|
|fixtures.output|
|fixtures.controller|

|Initialize System|
The root page now looks:
And the included SetUp page is:
After all this initial setup we are ready to start building our fixtures and our tests. There are a lot of tables provided by FitNesse but in my humble opinion most applications can be easily tested with the following 3 tables using the pattern:
- Input using Decision tables
- Processing using Script tables
- Output verification using Query tables
Starting with the input we will use a decision table to be able to enter the list of transactions. Here is our corresponding fixture.
public class AddTransaction {
	private String name;
	private BigDecimal amount;
	private String category;
	private Date date;

	public void execute() {
		Transaction transaction = new Transaction(name, amount, category, date);
		Repository.getInstance().getTransactions().add(transaction);
		System.out.println("added: " + transaction);
	}

	public boolean isAdded() {
		return true;
	}

    //getters
    //setters
Our fixture class uses the same field names with our POJO. Setters in a fixture class are called whenever the property is defined as a table header. These setters run for every row and then after that the execute method runs which basically in our fixture code all that it does, is adding this new Transaction created in a global Repository object which contains data to be reused later on from other fixture classes (script table, query table). Nothing to worry about concurrency issues regarding this global state holding object as each time you click test, FitNesse kicks off a new JVM process, so concurrent Tests run on separate virtual machines. Last feature of a desicion table is to added accessor methods which execute after the execute method if there is a column with the same name end a ? at the end (we won’t use it anyway).
Repository is a simple singleton object:
public class Repository {

	private static Repository instance;
	List<Transaction> transactions = new ArrayList<>();

	public static void refresh() {
		instance = new Repository();
	}

	public static Repository getInstance() {
		return instance;
	}

	public void setTransactions(List<Transaction> transactions) {
		this.transactions = transactions;
	}

	public List<Transaction> getTransactions() {
		return transactions;
	}
There exists inside this class also a refresh method which creates a new object so that we start with a fresh Repository containing its test data (quite useful when we execute a test suite). This refresh method is called by the InitializeSystem class mentioned before which as is included to run in the SetUp page is running before any test.
public class InitializeSystem {
	public InitializeSystem() {
		Repository.refresh();
	}
}
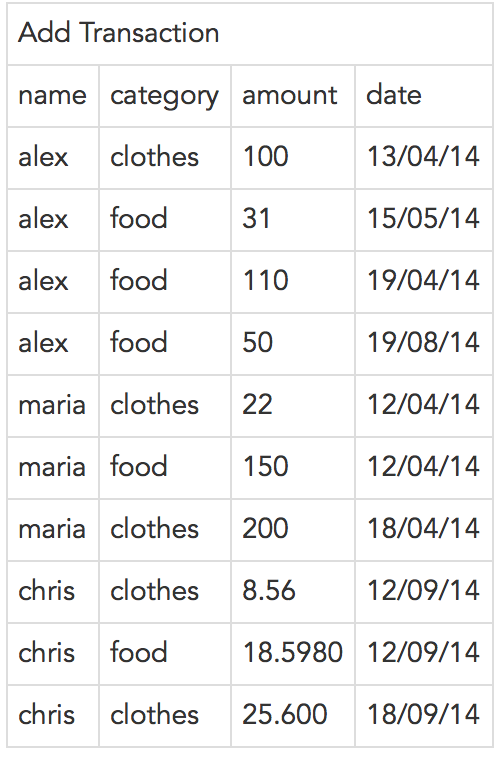
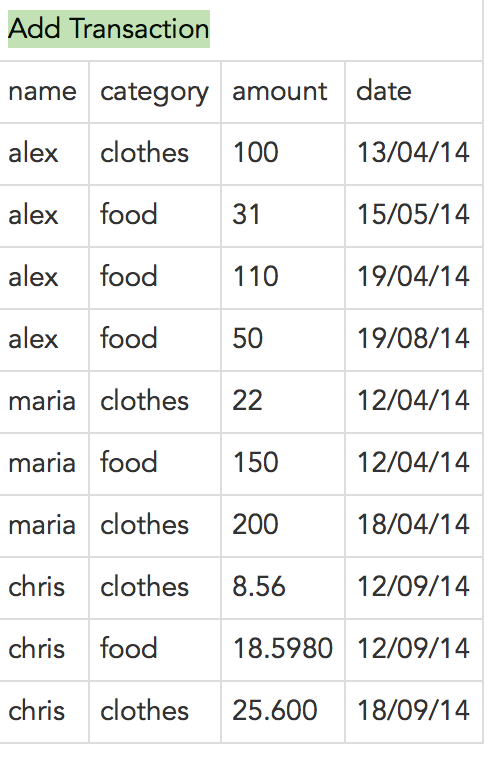
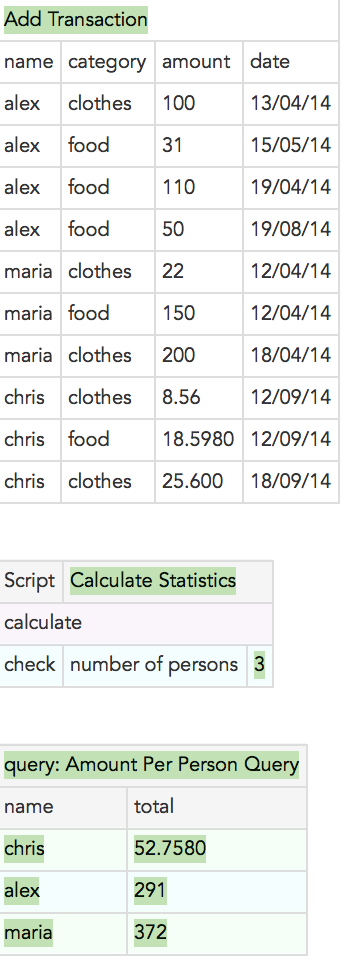
Now we are ready to create our first test using only the input fixture. Navigate to the root app page and add a test page from the menu with name TestAddTransactions. Then we enter the following:
!|Add Transaction               |
|name  |category|amount|date    |
|alex |clothes |100    |13/04/14|
|alex |food    |31     |15/05/14|
|alex |food    |110    |19/04/14|
|alex |food    |50     |19/08/14|
|maria|clothes |22     |12/04/14|
|maria|food    |150    |12/04/14|
|maria|clothes |200    |18/04/14|
|chris|clothes |8.56   |12/09/14|
|chris|food    |18.5980|12/09/14|
|chris|clothes |25.600 |18/09/14|
This is a simple desicion table and the header is always of type ! name of the class . Saving the page we have the following screen:
Now we can run the test but we get problems:
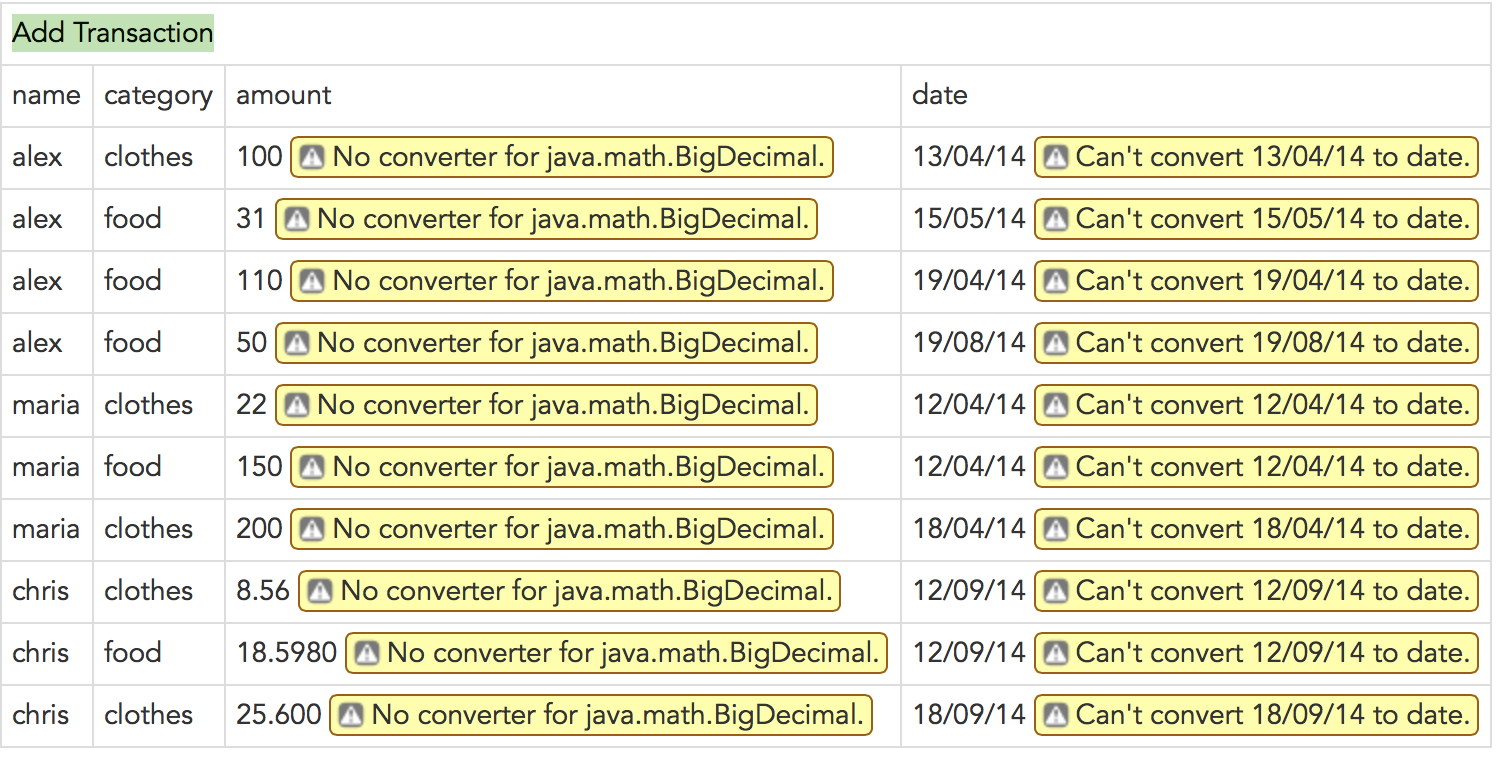
Reason for these problems is that there are no converters from the text type of the scripts to the BigDecimal and Date types that are required (as arguments in their setters methods) for fields amount and date. The 2 missing converters are the following:
public class BigDecimalConverter implements Converter<BigDecimal> {

	@Override
	public BigDecimal fromString(String arg0) {
		if (arg0 != null && !arg0.isEmpty())
			return new BigDecimal(arg0);
		return null;
	}

	@Override
	public String toString(BigDecimal arg0) {
		return arg0.toString();
	}

}

public class MyDateConverter implements Converter<Date> {

	SimpleDateFormat DATEFORMAT = new SimpleDateFormat("dd/mm/yy");

	@Override
	public Date fromString(String arg0) {
		if (arg0 != null) {
			try {
				return DATEFORMAT.parse(arg0);
			} catch (ParseException e) {
				// TODO Auto-generated catch block
				e.printStackTrace();
			}
		}
		return null;
	}

	@Override
	public String toString(Date arg0) {
		// TODO Auto-generated method stub
		return null;
	}

}
And we need also to register them in the InitializeSystem:
public InitializeSystem() {
		fitnesse.slim.converters.ConverterRegistry.addConverter(
				BigDecimal.class, new BigDecimalConverter());

		fitnesse.slim.converters.ConverterRegistry.addConverter(Date.class,
				new MyDateConverter());

		Repository.refresh();
	}
With these changes we get success and we run Test again and get green:
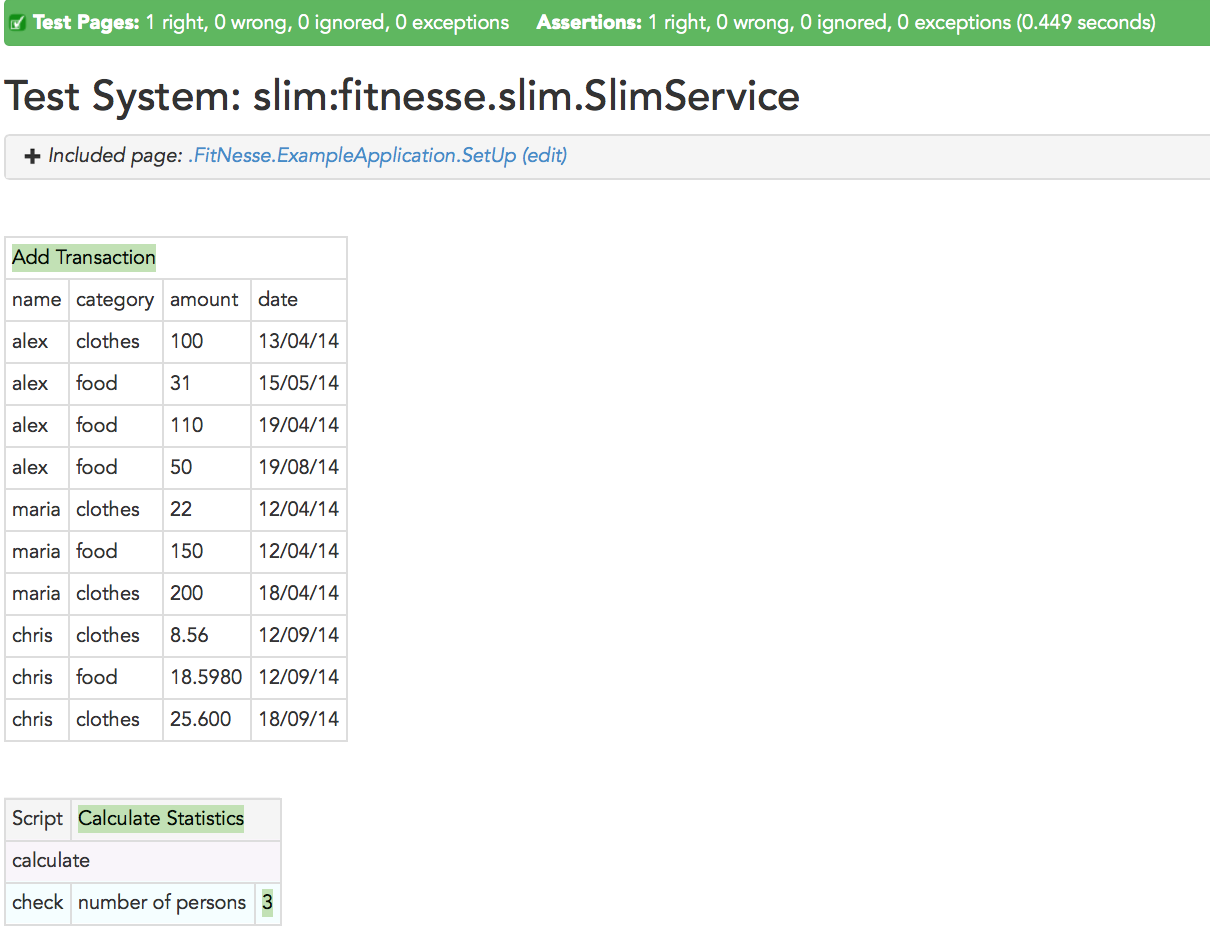
Since now we have our input read and set into the repository we continue with the module calculation invocation. For that we will use a script table which is a table where each row is a single instruction in the script. Script tables are represented by !| Script|Name of the class|optional constuctors arguments|
!|Script|Calculate Statistics|
|calculate                   |
|check  |number of persons |3|
Adding the above and pressing Test will give us the following. The check primitive at the end is a FitNesse command which after invoking the method numberOfPersons in our Fixture, verifies that the value is 3 (distinct persons in our transactions)
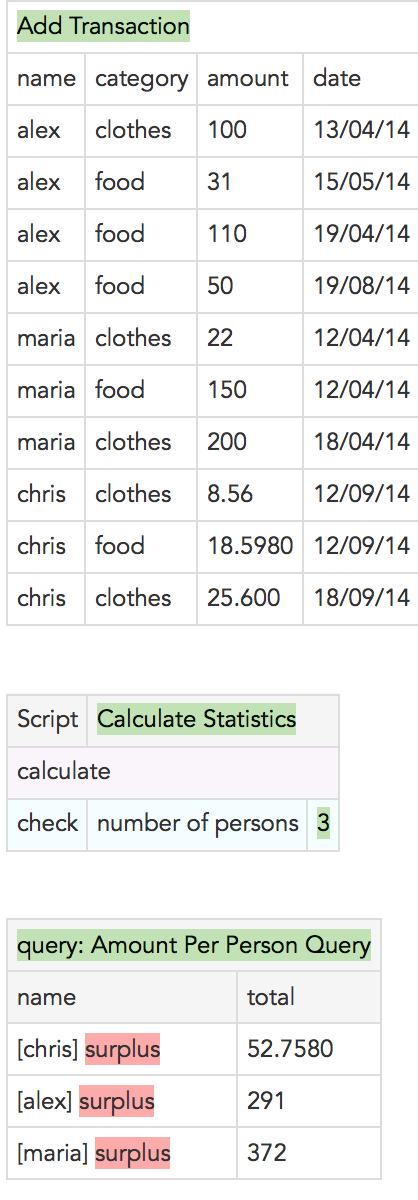
Next and final step is to verify the correctedness of the results. Since our results exist in collections, a natural fit for our verification table is a query table. This fixture needs to create a list for every result row containing lists of 2 items containing the column name and the correspnding value. This structure then is compared with the expected records we have in out test script. A great feature of this table is that we can even avoid having expected results and in this case we will get the actual records marked as surplus of course. Our query table for the total per person results is the following (Query tables are identified by the word query followed by a colon and the name of the fixture class):
!|query: Amount Per Person Query|
|name|total|
In the above as you can see we haven’t specified any expected result yet as we are bored to do the calculations by hand ;)
The fixture class needed for this case can be any class with a method signature of:
public List<Object> query()
acting as an adaptor basically between the application’s results and the FitNesse expected tabular form.
In detail our fixture for this is:
public class AmountPerPersonQuery {

	public List<Object> query() {

		LinkedList<Object> allResults = new LinkedList<Object>();

		Map<String, BigDecimal> totalPerPerson = Repository.getInstance()
				.getTotalAmountPerPerson();

		if (totalPerPerson != null) {
			for (String each : totalPerPerson.keySet()) {
				allResults.add(asList(
                            asList("name", each),
                            asList("total", totalPerPerson.get(each))));
			}

		}

		return allResults;
	}
}
Notice the 2 column names we used in the code representing the first item of the nested lists inside the row representing list. Running oour test we get the 3 ‘surplus’ rows as we haven’t specified anything for expected results.
Now that we know the results lets put them in out test so that we get the well deserved green for our good work:
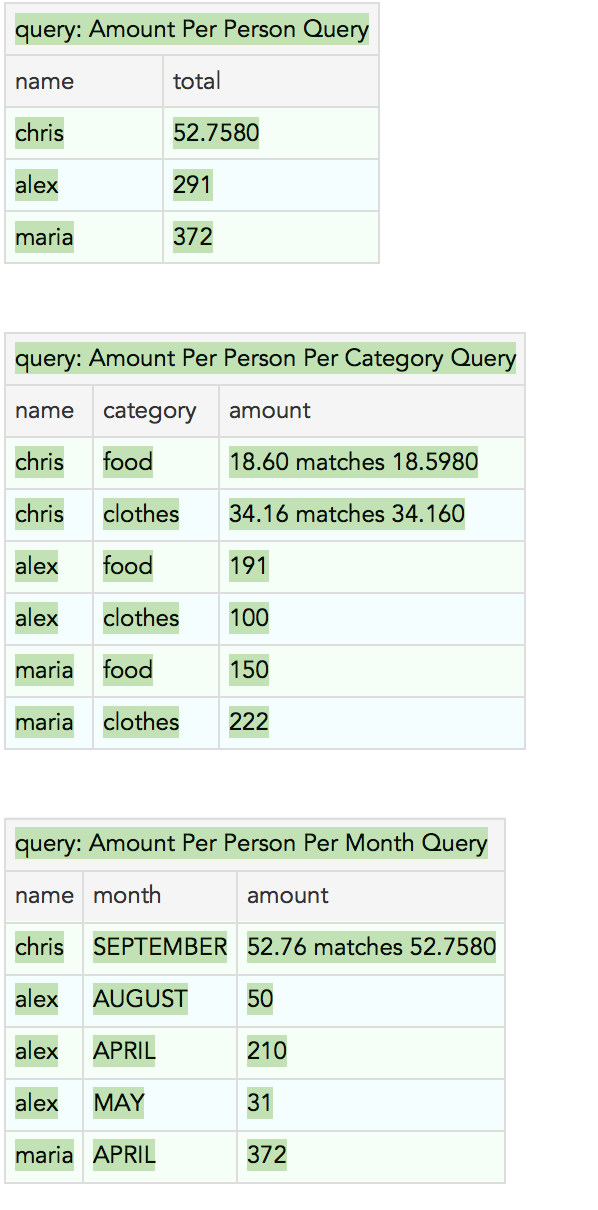
!|query: Amount Per Person Query|
|name          |total           |
|chris         |52.7580         |
|alex          |291             |
|maria         |372             |
And indeed running the test again we get:
Similarly for the amount per person per category results we define the following query table:
!|query: Amount Per Person Per Category Query|
|name        |category        |amount        |
with the corresponding fixture class:
public class AmountPerPersonPerCategoryQuery {

	public List<Object> query() {

		LinkedList<Object> allResults = new LinkedList<Object>();

		Map<String, Map<Object, BigDecimal>> totalPerPersonPerCategory = Repository.getInstance()
				.getTotalPerPersonPerCategory();

		if (totalPerPersonPerCategory != null) {
			for (String person : totalPerPersonPerCategory.keySet()) {
				Map<Object, BigDecimal> amountPerCategory = totalPerPersonPerCategory.get(person);
				for (Object category: amountPerCategory.keySet()) {
					allResults.add(asList(
                        asList("name", person),
                        asList("category", category),
                        asList("amount", amountPerCategory.get(category))));
				}
			}

		}

		return allResults;
	}
}
and our test now when runs looks like:
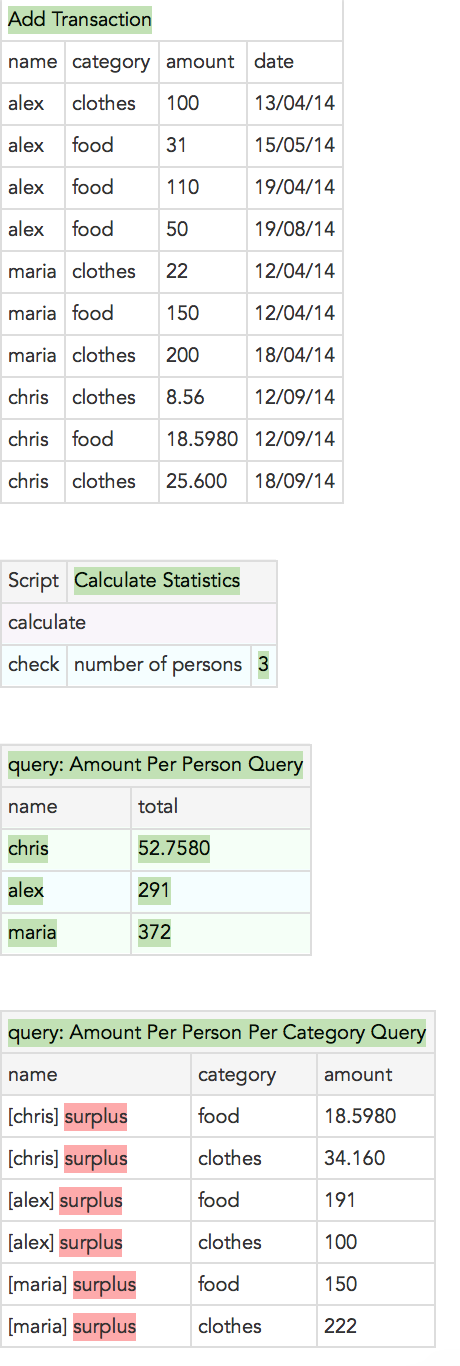
Let’s proceed by adding again the expected results but let’s take it a step further by noticing that in the last test we had a result with 4 decimal digits for the first record. This is something we would like to ignore as 2 decimal digits is enough for us and the rest just noise. As before we add the expected results but with up to 2 decimal digits this time:
!|query: Amount Per Person Per Category Query|
|name         |category        |amount       |
|chris        |food            |18.59        |
|chris        |clothes         |34.16        |
|alex         |food            |191          |
|alex         |clothes         |100          |
|maria        |food            |150          |
|maria        |clothes         |222          |
As expected we have failures:
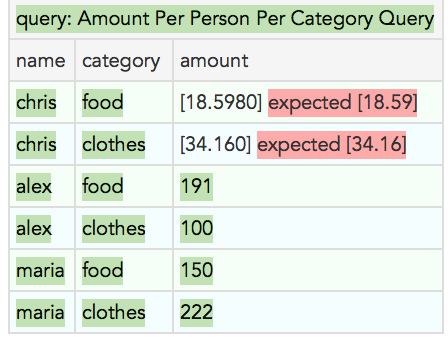
To solve this problem we need to add a so called custom comparator and register it inside a file named plugins.properties in the same folder where FitNesse starts. This comparator will basically match BigDecimals up to the 2nd decimal digit.
public class BigDecimalComparator implements CustomComparator {
	private static final int SCALE_BY = 2;

	@Override
	public boolean matches(String arg0, String arg1) {
		return round(arg0).equals(round(arg1));
	}

	public BigDecimal round(BigDecimal value) {
		return value.setScale(SCALE_BY, RoundingMode.HALF_EVEN);
	}

	public BigDecimal round(String value) {
		return round(new BigDecimal(value));
	}
}
Then we create a plugins.properties and we put inside there the prefix for our comparator and its full class name:
CustomComparators = decimal2:fixtures.global.BigDecimalComparator (we can also add more using commas)
Next we need to restart FitNesse to add to our test, wherever we want this comparator to take effect, its prefix before the expected number. Also now since we need to have available in the classpath the classes that we declare as custom comparators, we need to chnage the way we start FitNesse and use -cp and not -jar as with the -jar option the -cp one is ignored. Therefore now we need to run fitnesse using:
java -cp "paths-to-jar-or-classes-folders-of-comparators;fitnesse-standalone.jar" fitnesseMain.FitNesseMain -p 8080
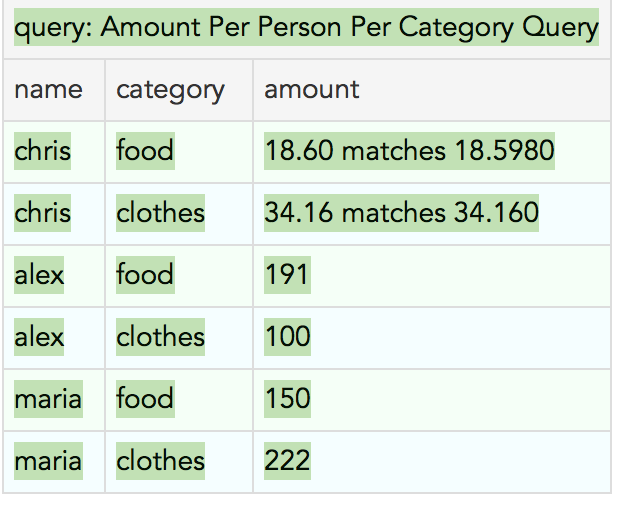
Our final query table is:
!|query: Amount Per Person Per Category Query|
|name      |category     |amount             |
|chris     |food         |decimal2:18.60     |
|chris     |clothes      |decimal2:34.16     |
|alex      |food         |191                |
|alex      |clothes      |100                |
|maria     |food         |150                |
|maria     |clothes      |222                |
Rerun the Test and we get:
Adding in a similar way the last query table we get the final run:
Summary
FitNesse is an excellent tool with many many options of which i believe the above described are sufficient for a great deal of applications. Most attractive to me is that it can easily involve into Acceptance Test Driven approaches, critical stakeholders of the application and so improve at the end your software quality. Business analysts can hit the FitNesse url and drive the development forward by providing test scenarios or they can even work just by using Excel if you use the excellent Export to Excel menu option of FitNesse!
All source code and FitNesse files of the above example are here.